RACONF'26 — CTF WRITE-UP
On this page
- 01 — Aurora Industries
- Goal
- Quick Summary
- Step by Step
- 1. Confirm Node 7 exists and check its status
- 2. Open the fallback interface
- 3. Extract the leaked password
- 4. Inspect the profile-update flow
- 5. Capture the request and try the first auth_key
- 6. Learn the expected format from the error message
- 7. Encode the password and resend
- 8. Acquire admin privileges
- 9. Inspect the operations panel
- 10. Send the POST manually instead of clicking
- 11. Bring Node 7 online and grab the final output
- Conclusion
- 02 — Nova Media Network
- Goal
- Quick Summary
- Step by Step
- 1. Find the astro_jou761 account
- 2. Follow the hint inside the X post
- 3. Pivot to GitHub via Space Oddity
- 4. Inspect repo contents
- 5. Find the deleted file in commit history
- 6. Recover the deleted image and inspect it
- 7. Extract the flag from EXIF metadata
- Conclusion
- 03 — kepler10b.apk
- Goal
- Quick Summary
- Decoy Flags
- Step by Step
- 1. Open the APK and inspect the login flow
- 2. Extract the correct password from the native verify function
- 3. Reverse the real generation chain in FlagActivity
- 4. Unwind the XOR layers
- Conclusion
- 04 — Orbital Communications
- Goal
- Quick Summary
- Step by Step
- 1. Validate the image structure
- 2. Identify the file system
- 3. List the file tree
- 4. Gather context from text artifacts
- 5. Search for deleted login data on the raw disk
- 6. Carve the deleted SQLite database
- 7. Validate the archive password
- 8. Extract signal.wav from the archive
- 9. Decode the audio signal
- Conclusion
- 05 — Helix Biocore
- Goal
- Quick Summary
- Packet Structure
- Step by Step
- 1. Factor the RSA modulus
- 2. Decrypt the wrapped AES key
- 3. Decrypt the final data with AES-CBC
- Python Solution
- Conclusion
- 06 — Quante Systems
- Goal
- Quick Summary
- Step by Step
- 1. Gather initial clues
- 2. Extract the XOR core
- 3. Locate the permutation step
- 4. Reverse the final check in the guard module
- Generating the Flag
- Conclusion
This post collects the write-ups for the 6 challenges I solved at the RACONF’26 CTF. Each section is self-contained — feel free to jump straight to the one you care about.
01 — Aurora Industries
The solution chains together discovery of a hidden fallback interface, a leaked password from logs, role escalation, and direct invocation of a backend endpoint that’s still alive behind a broken UI.
Goal
Unlock Node 7 and obtain the final output.
Quick Summary
The solve flow:
Node 7appears offline in the normal interface.- Hitting
node.php?id=7opens a fallback file-system view that leaks logs. - The logs reveal the value
bubirsifredir. - The
edit_profile.phpendpoint allows changingrole, but requiresauth_key. - An error message hints that
auth_keyis expected to be base64-encoded. - The
operatoruser is promoted toadmin. - A direct POST to
operations.phpbringsNode 7back online.
Step by Step
1. Confirm Node 7 exists and check its status
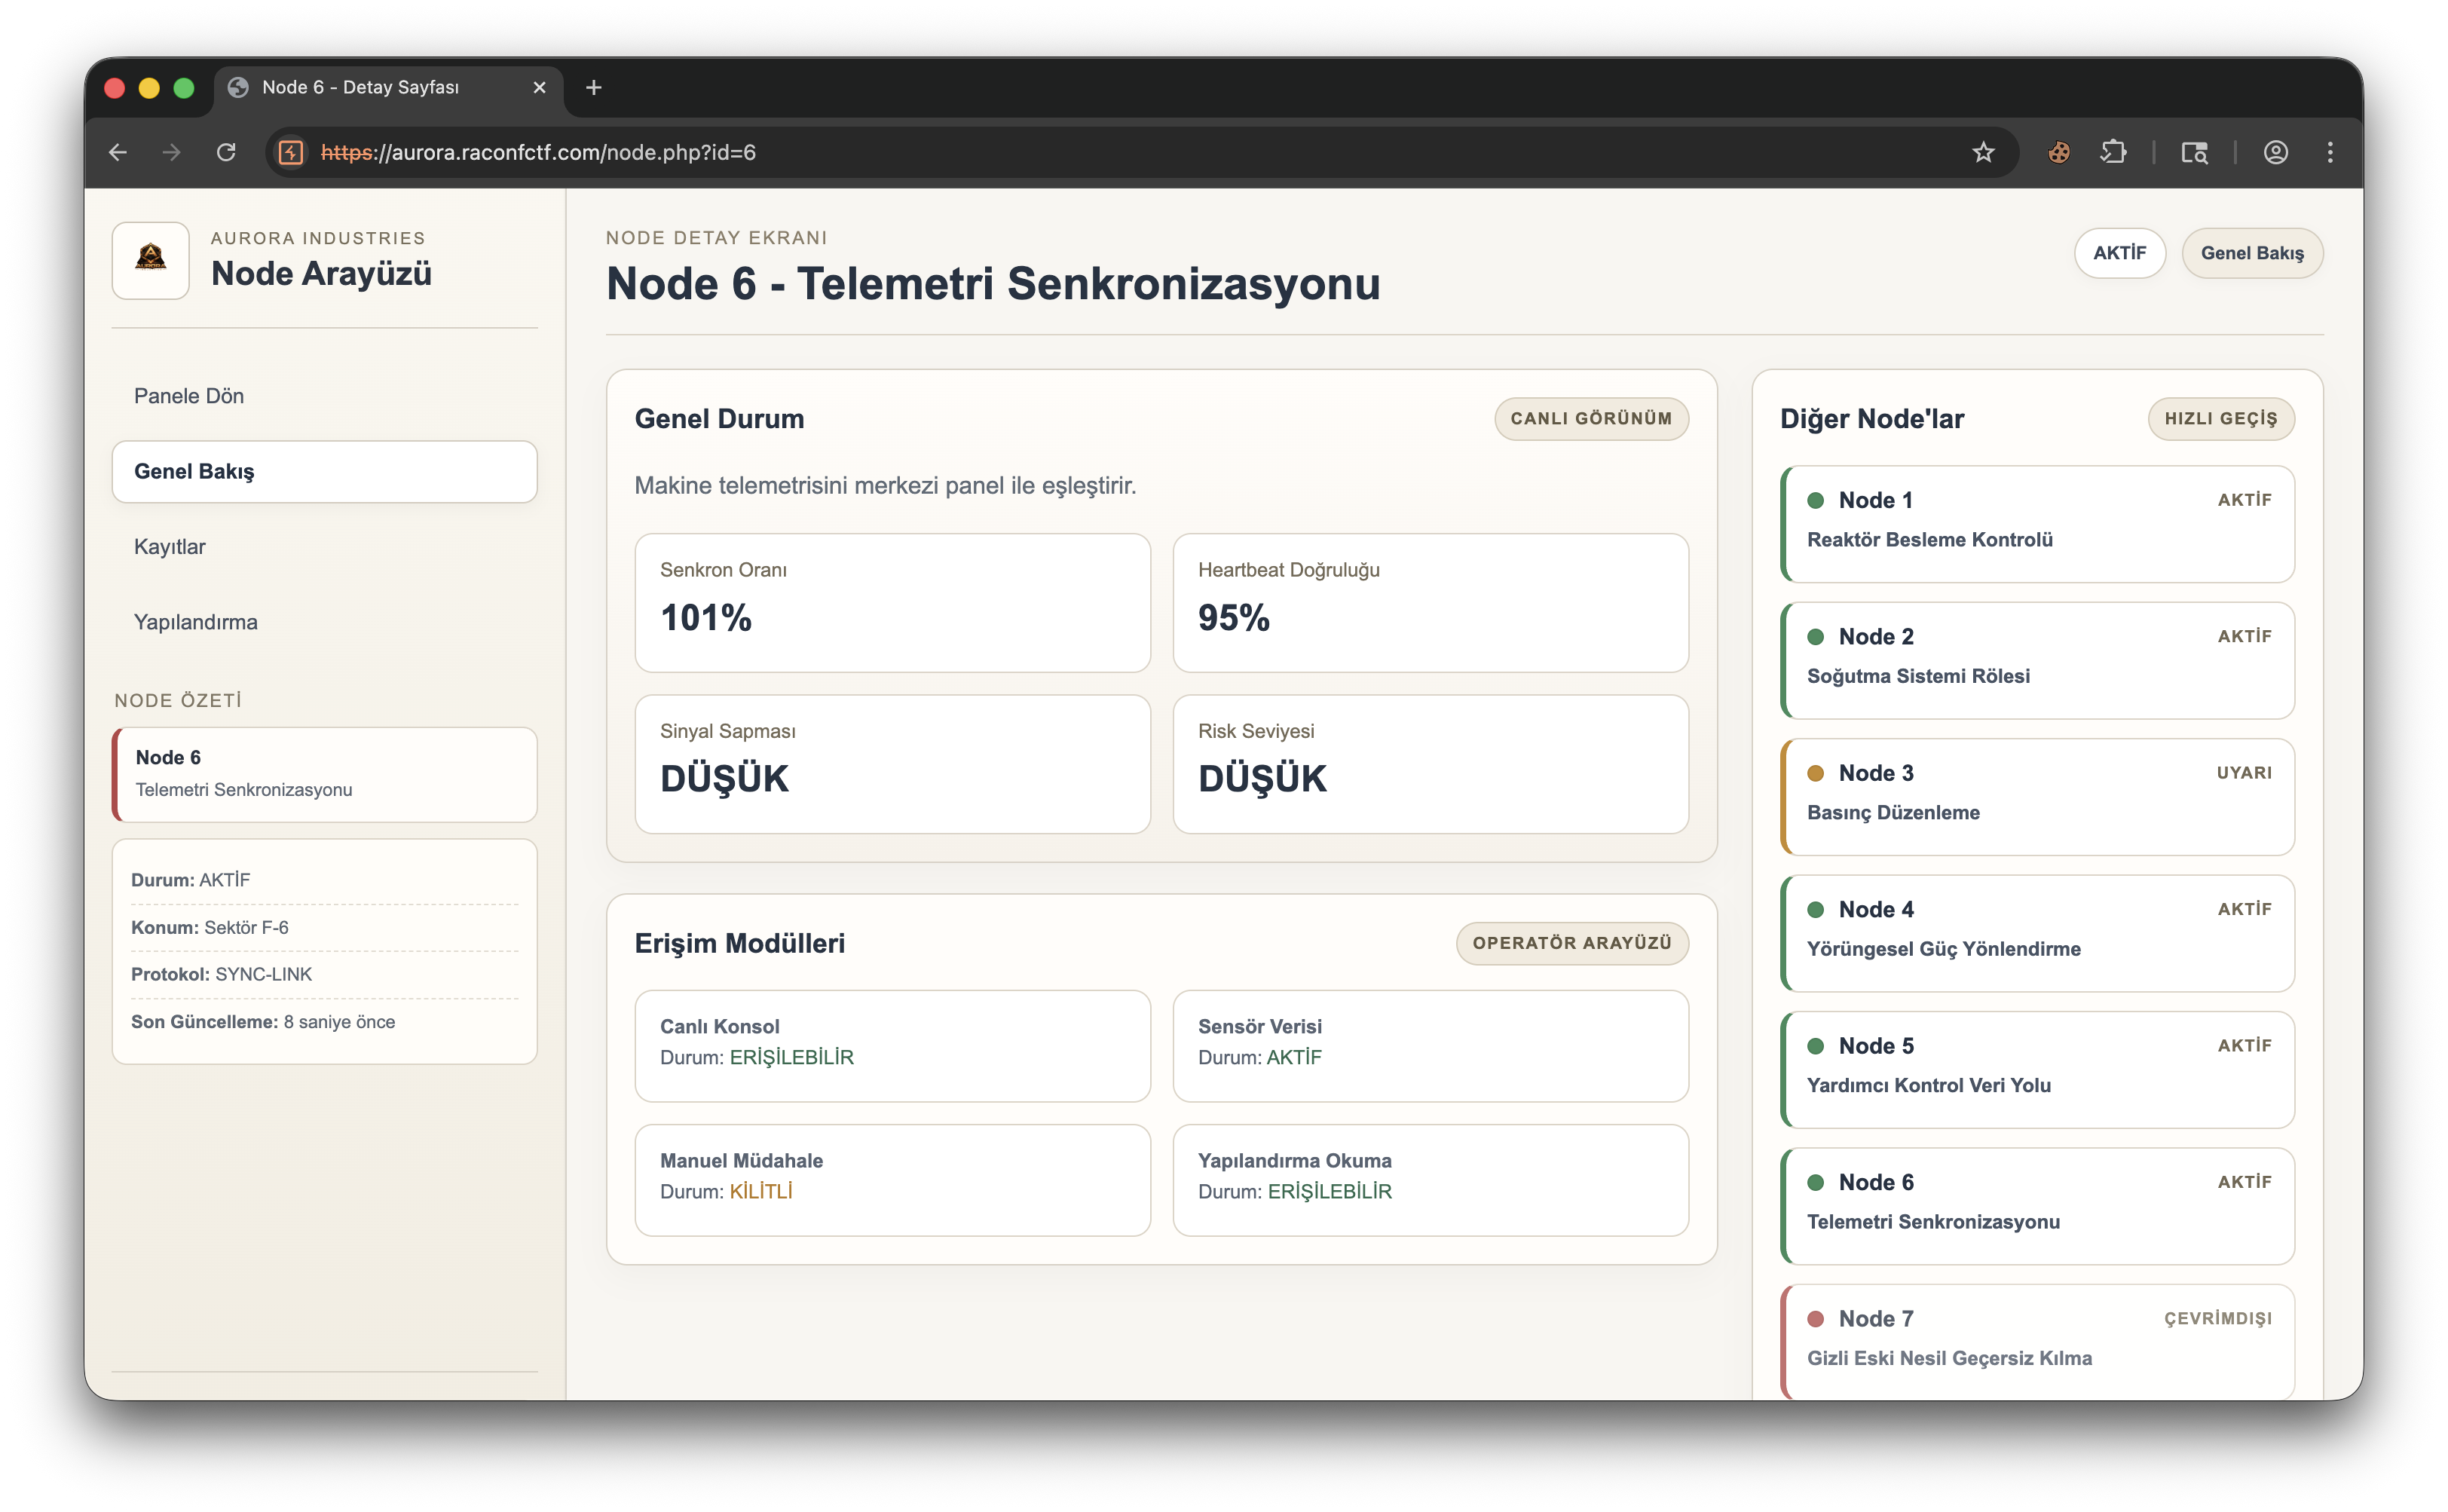
The initial screen has node.php?id=6 open. Node 7 is listed on the right but its status is OFFLINE. So an extra component is defined in the system that the standard flow can’t reach.
2. Open the fallback interface
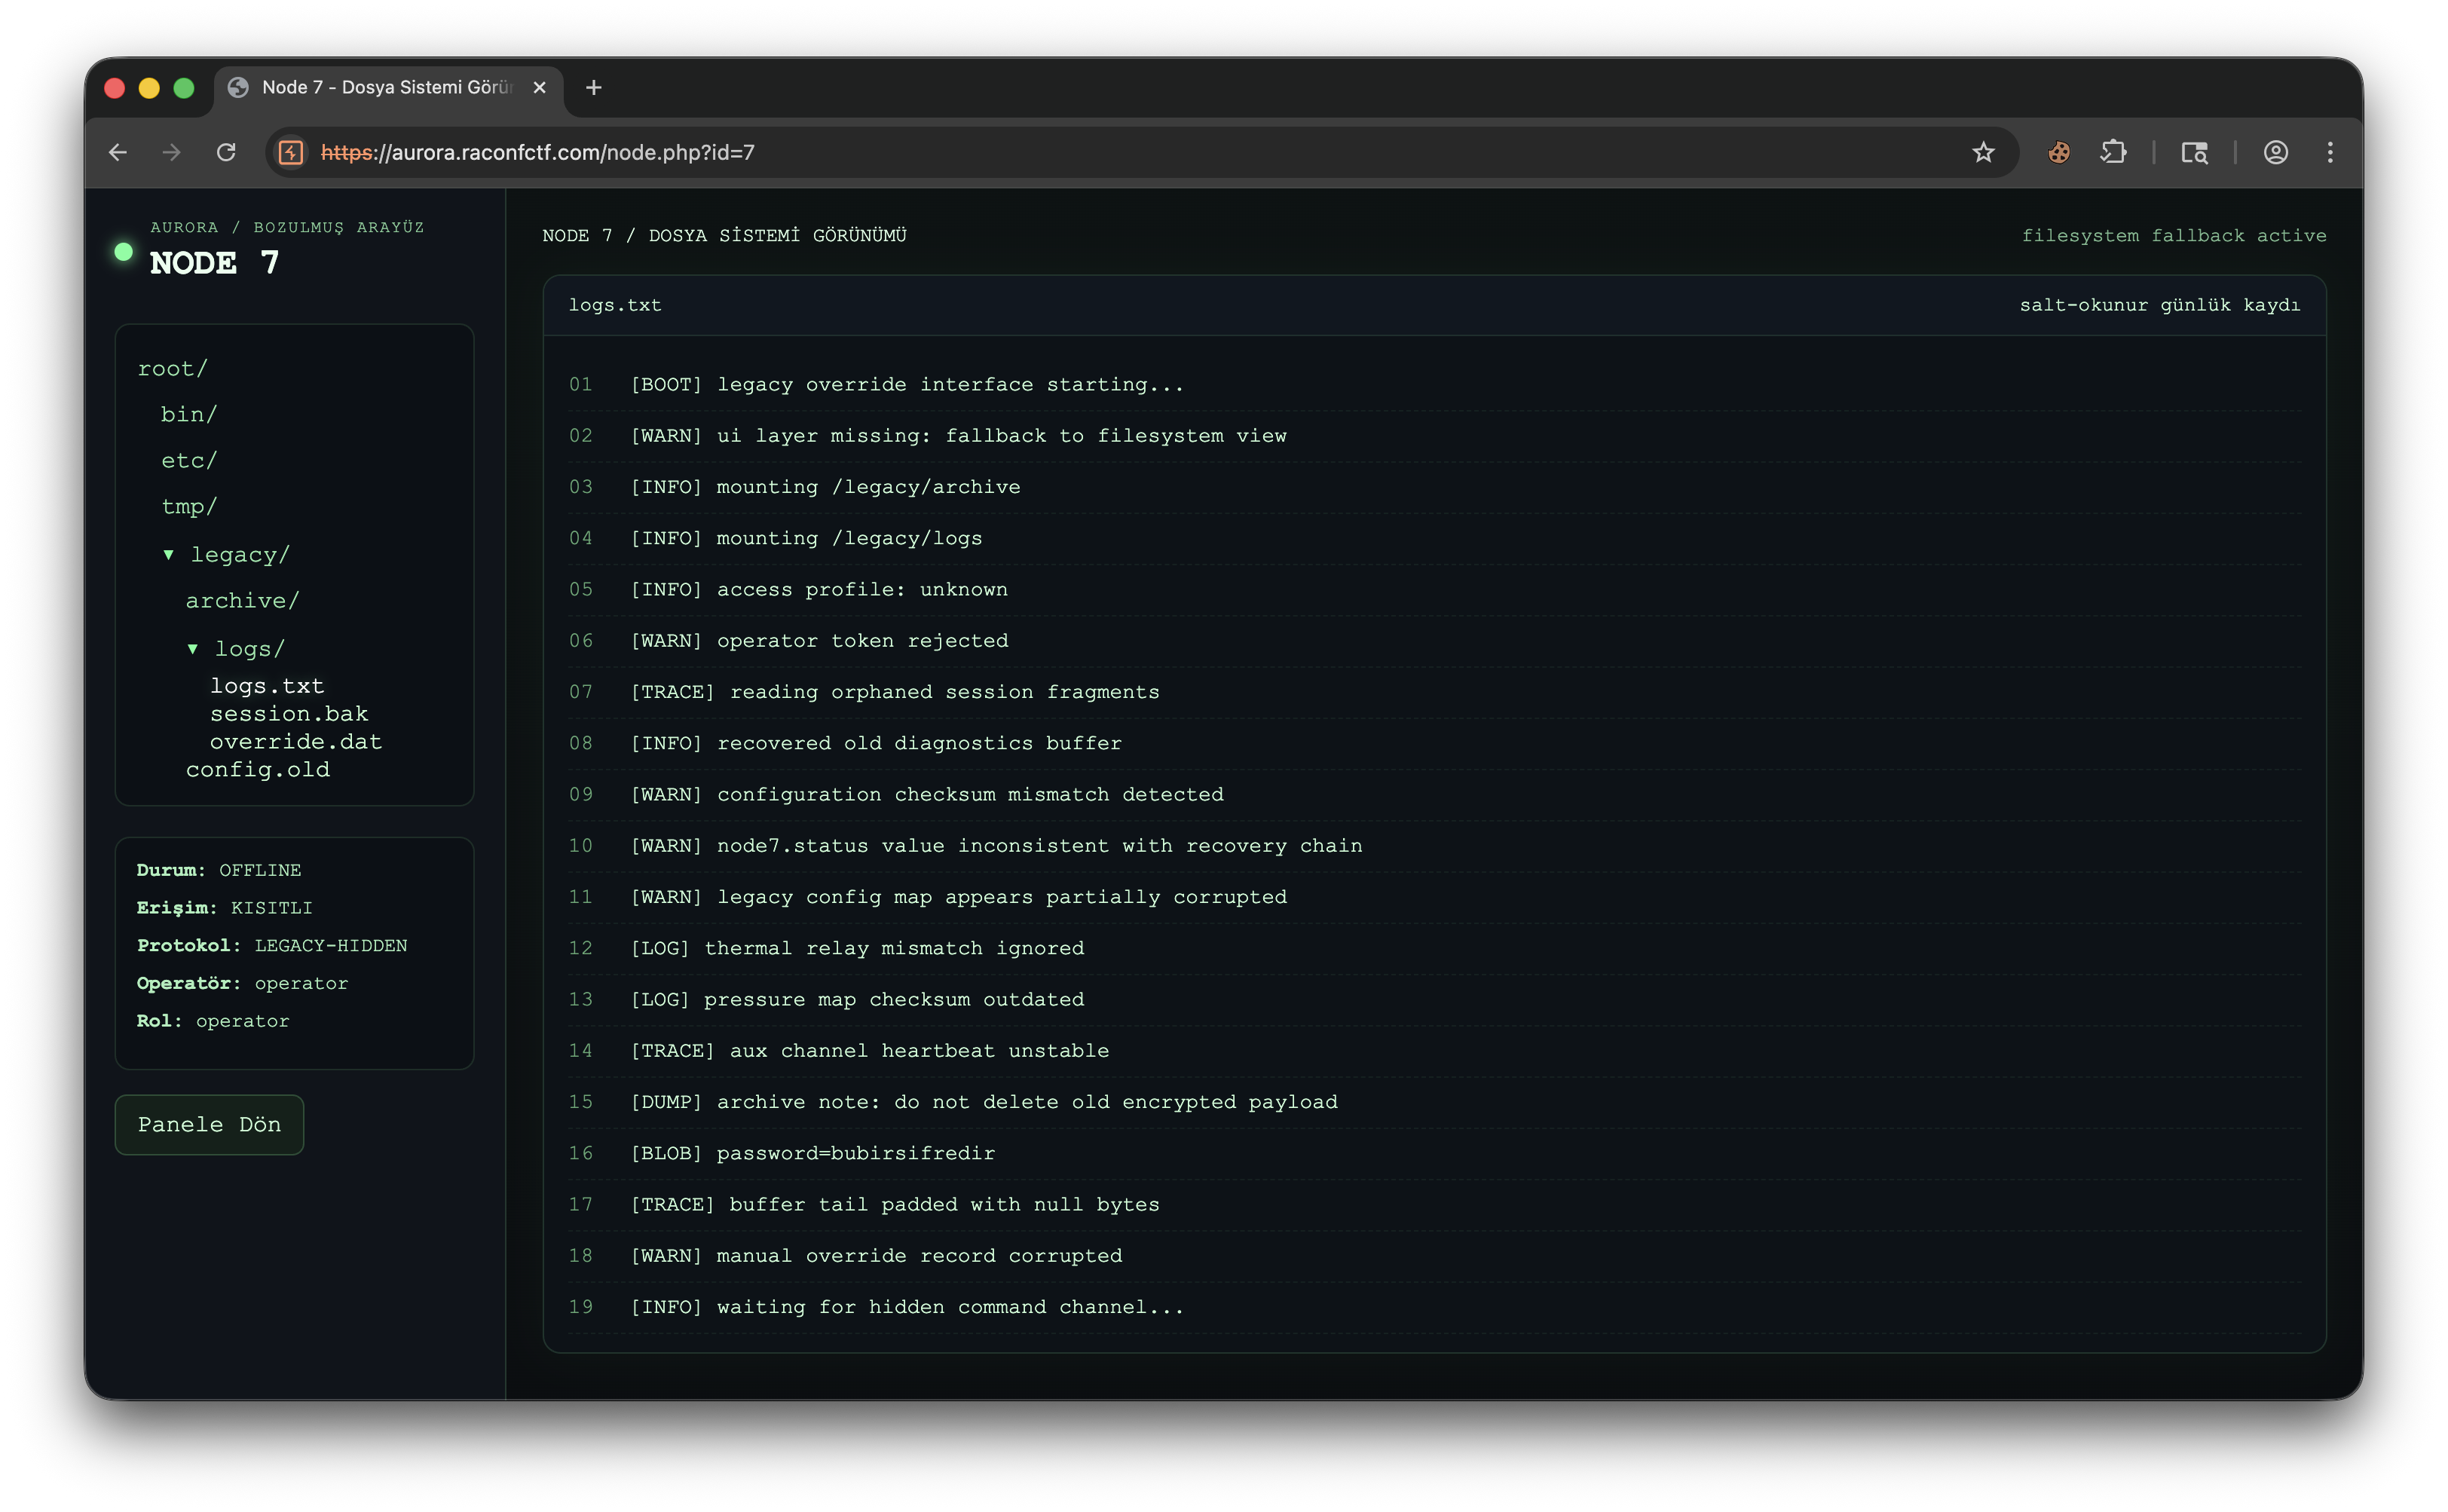
Visiting node.php?id=7 doesn’t show the normal panel — instead, a broken fallback interface that mimics a file system, allowing us to read legacy/logs/logs.txt.
Notable lines from the log:
operator token rejectedwaiting for hidden command channel...[BLOB] password=bubirsifredir
The third line leaks a directly usable credential.
3. Extract the leaked password
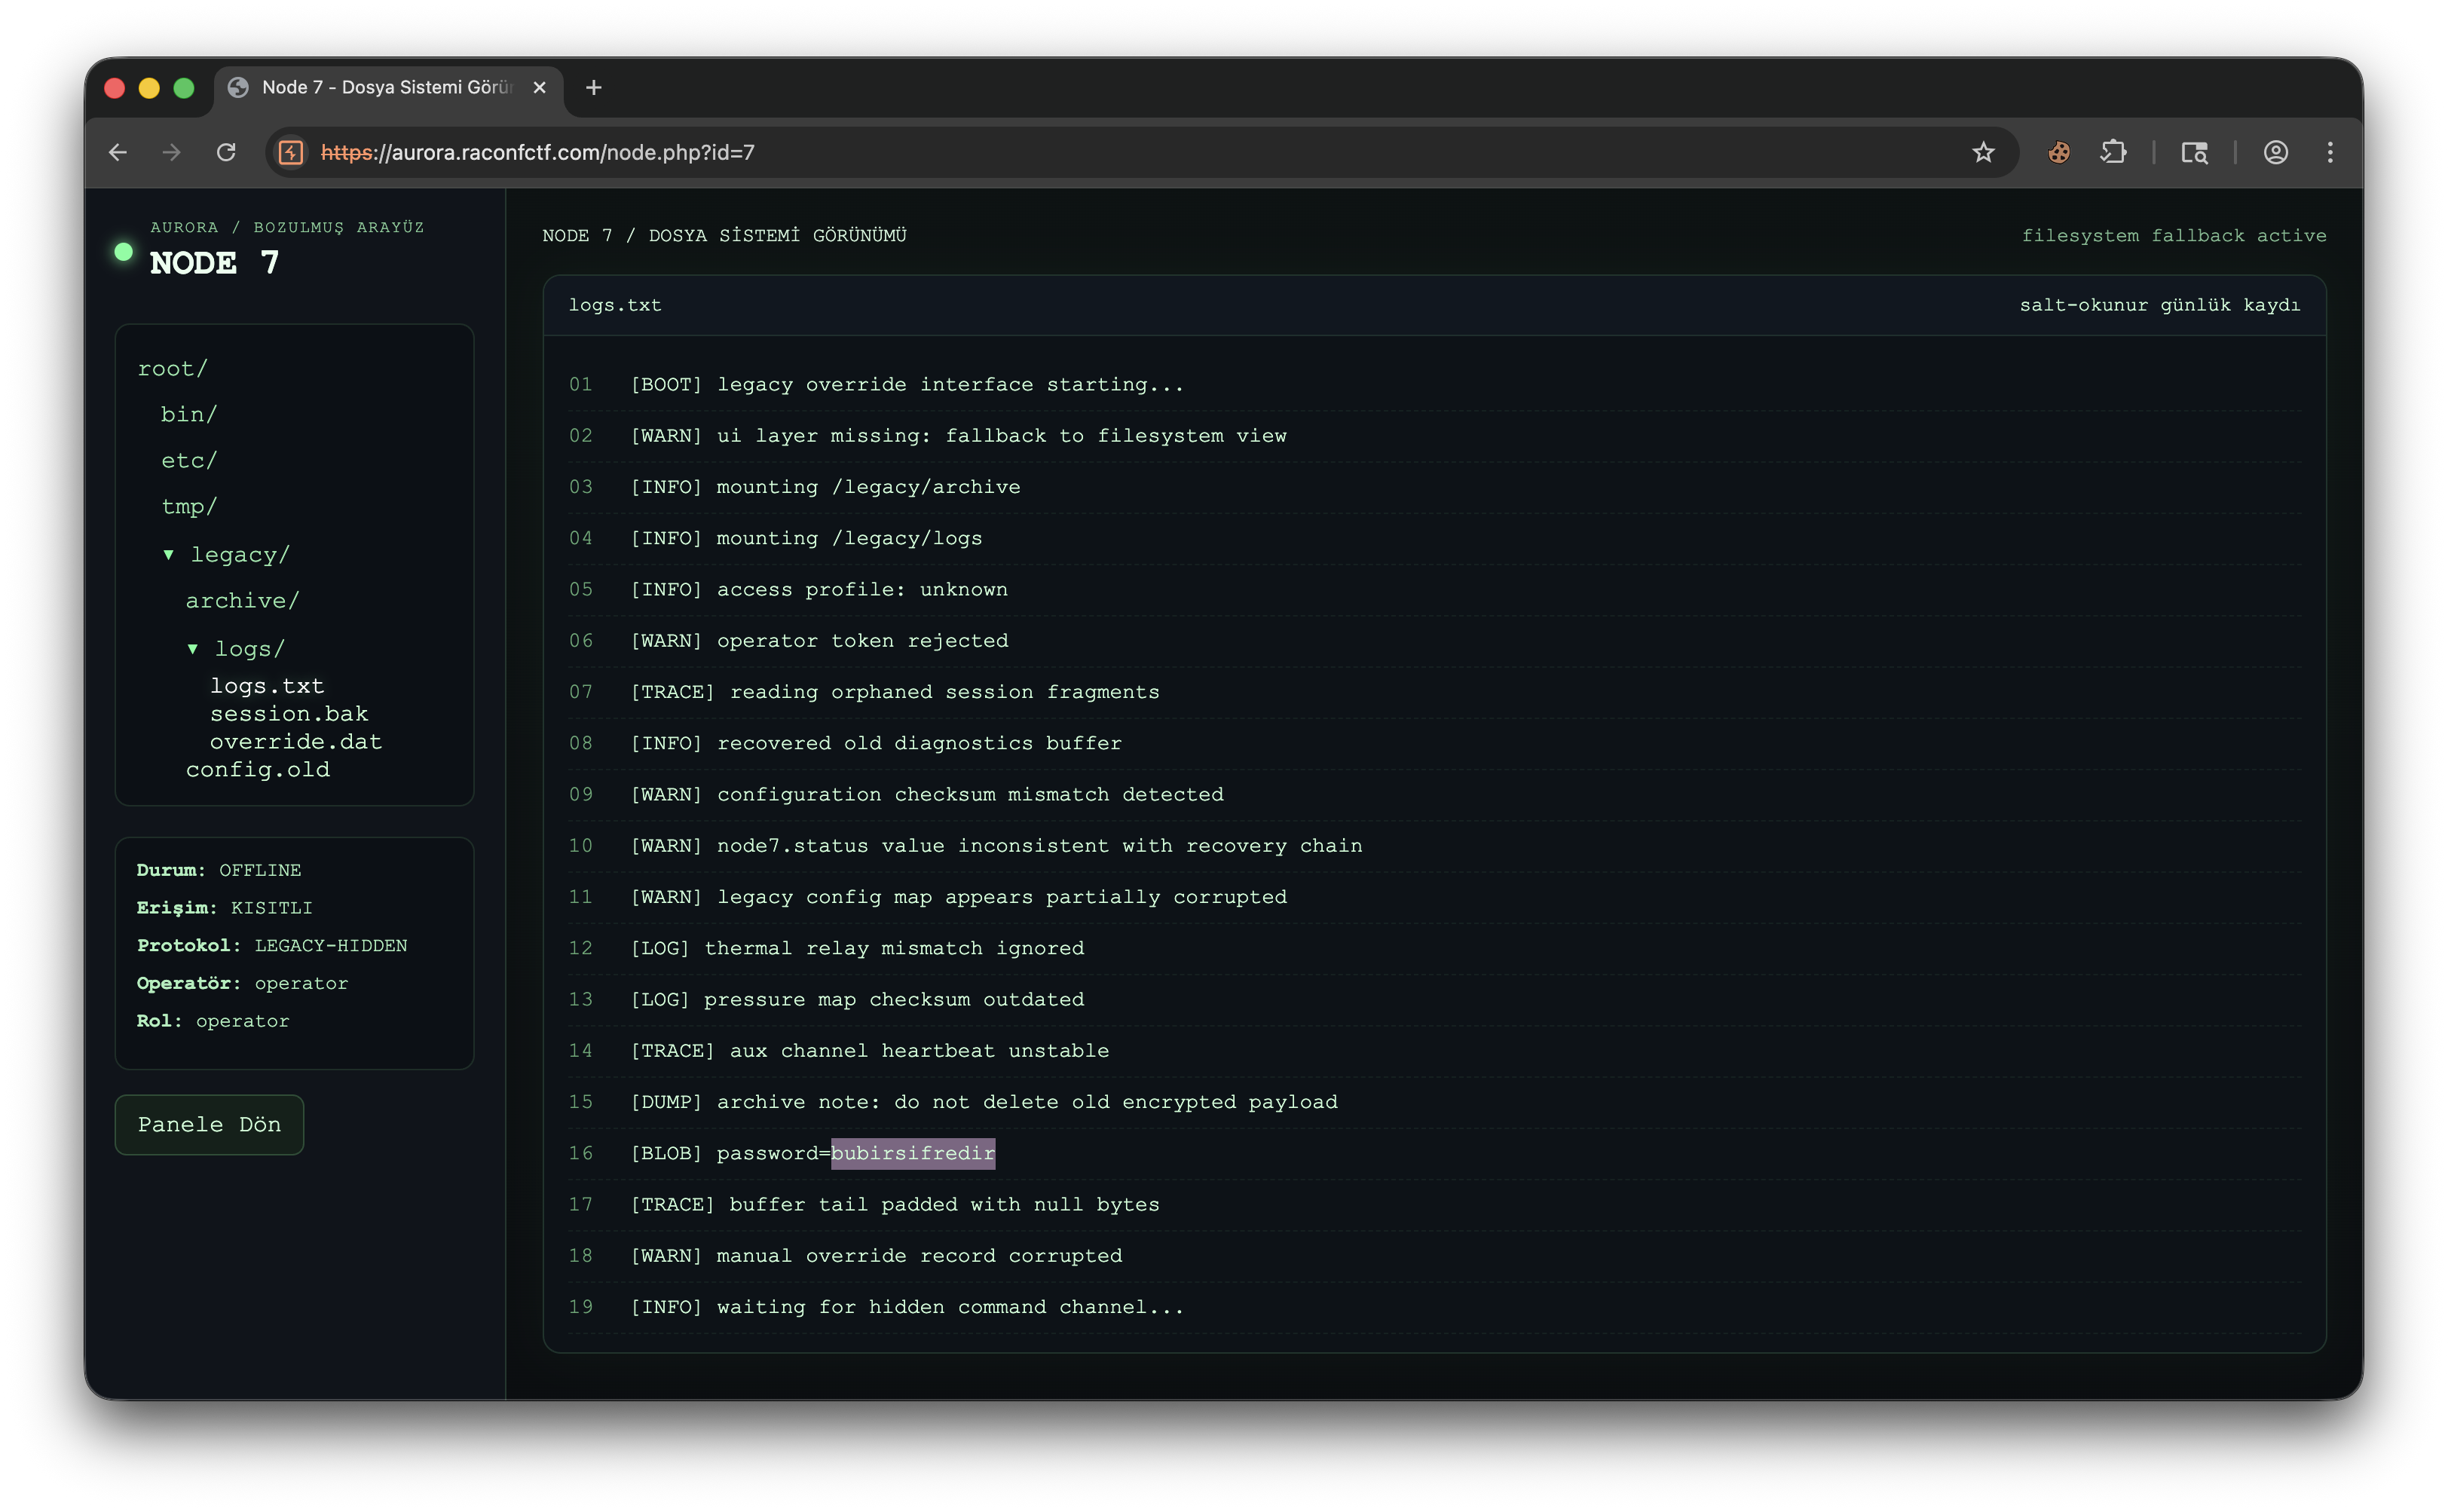
The critical value:
bubirsifredirThis will be tried as auth_key in the next step.
4. Inspect the profile-update flow
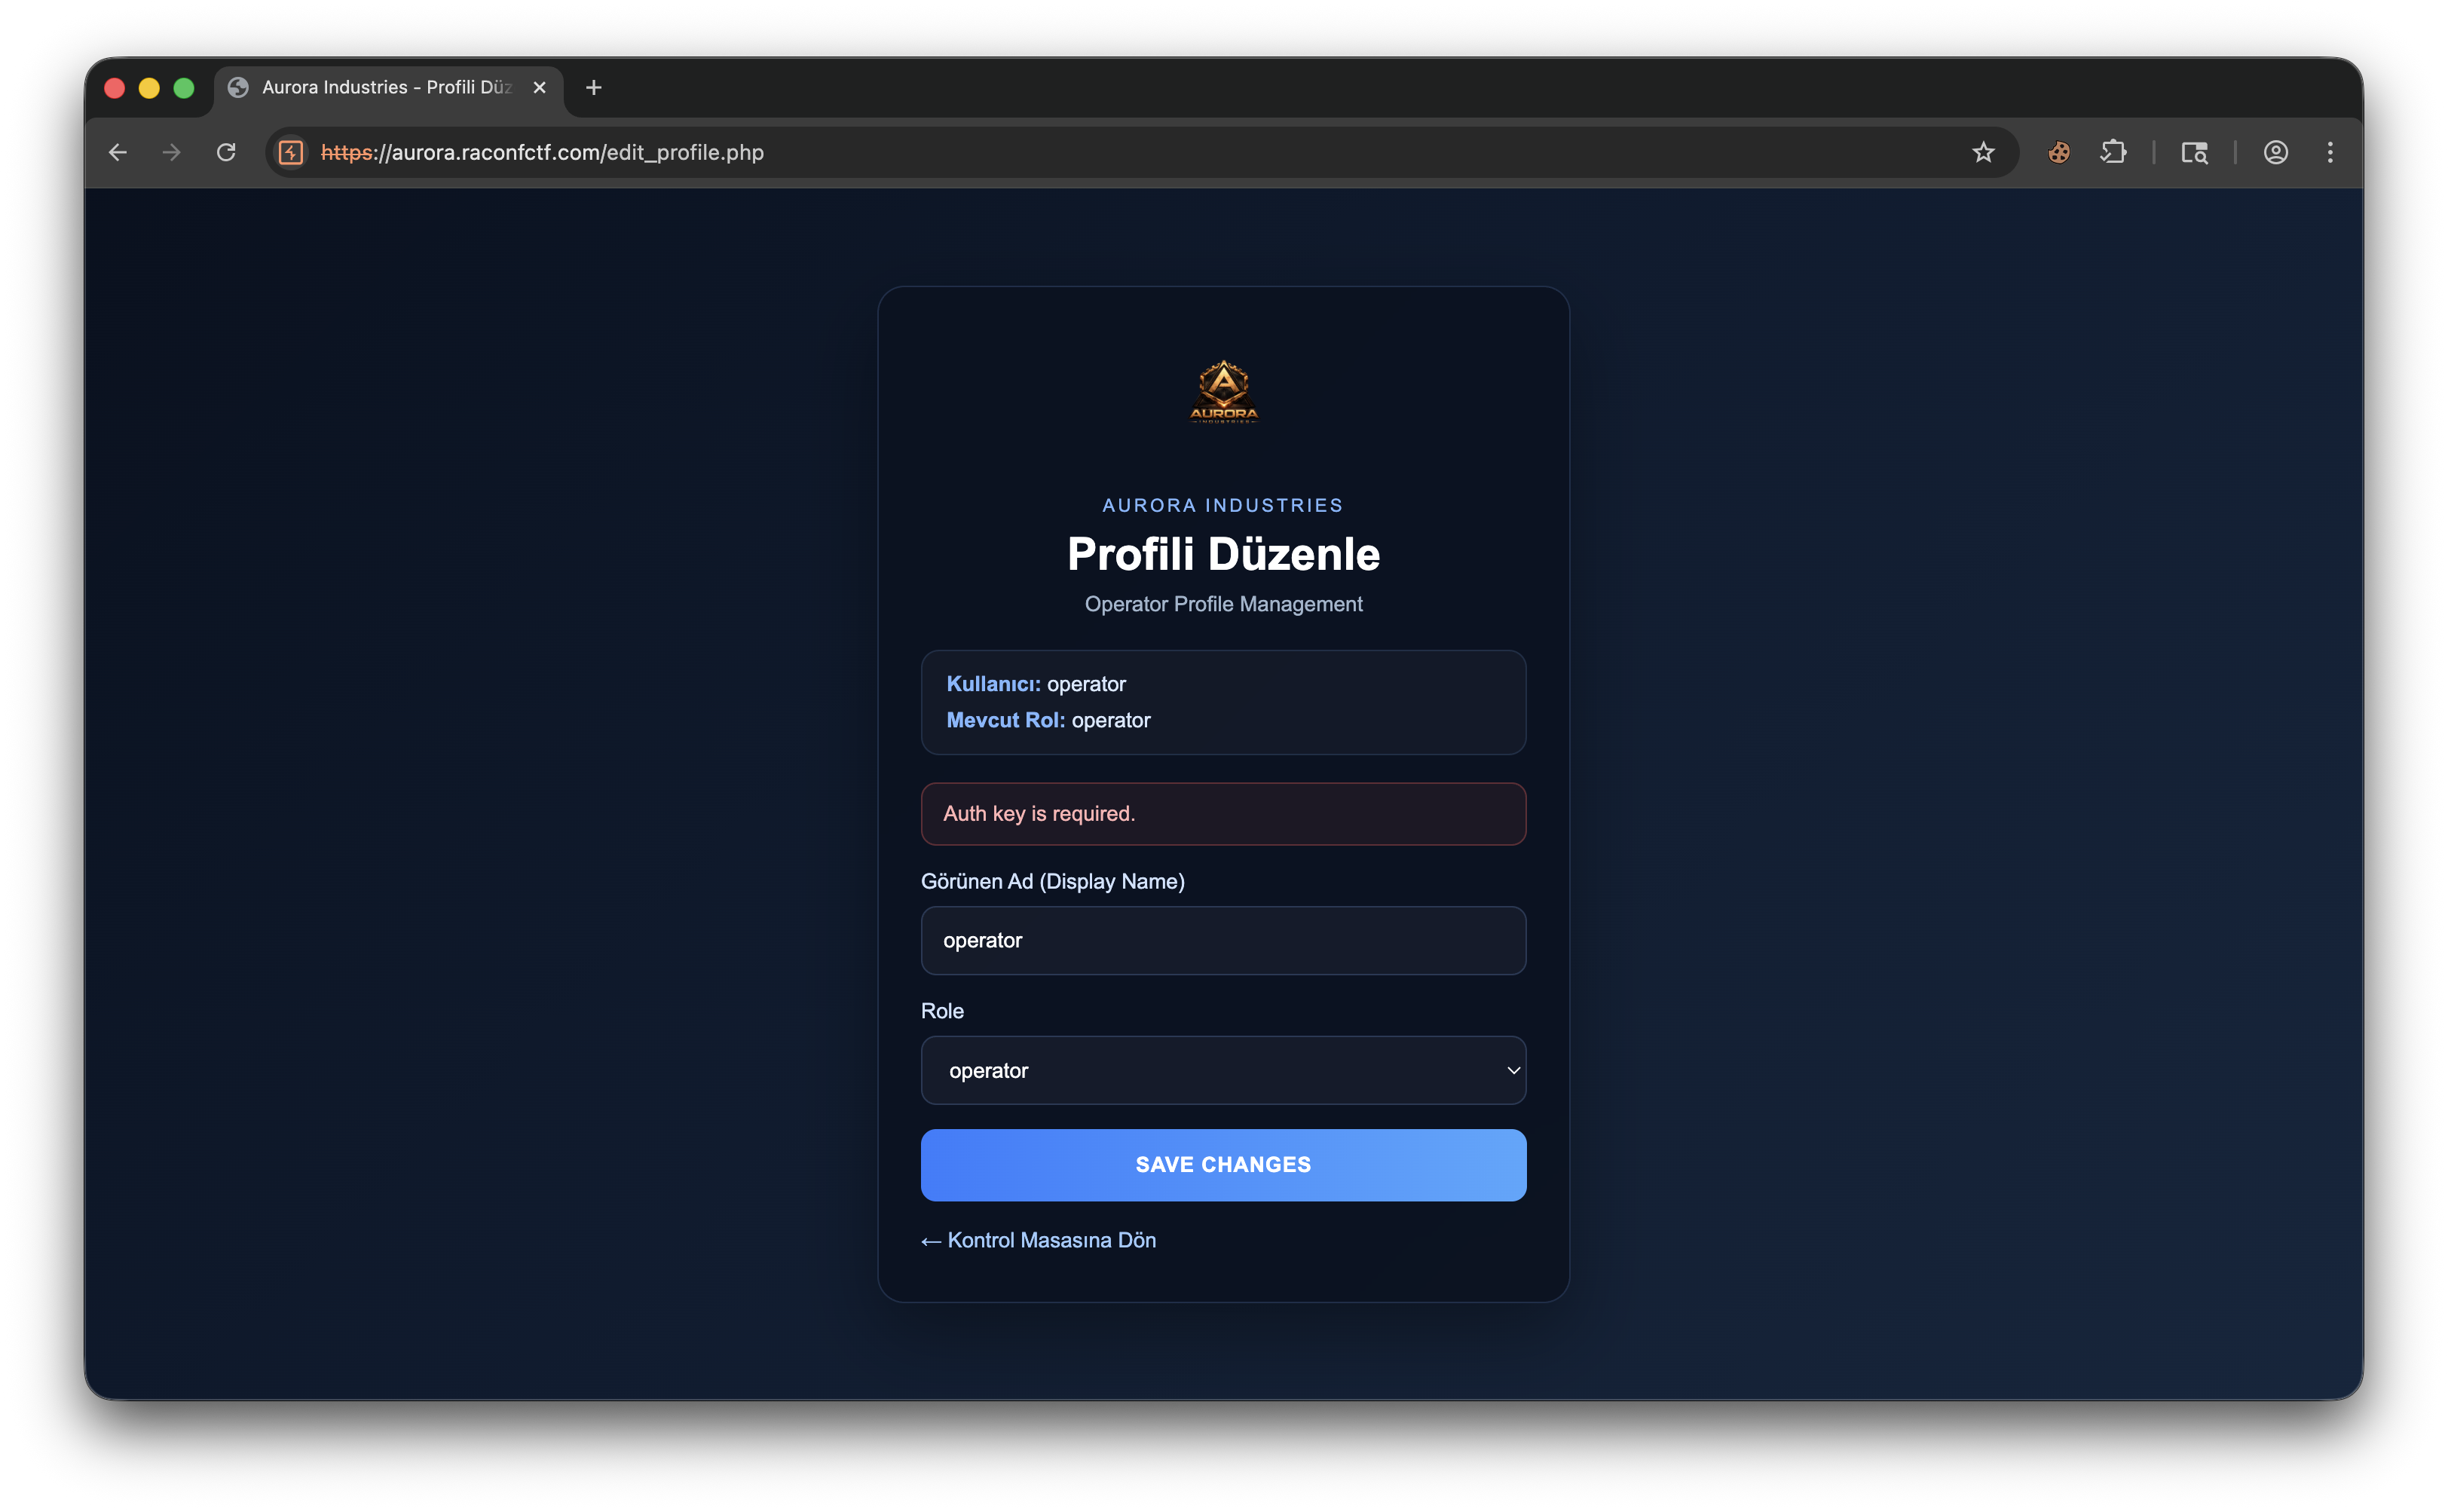
edit_profile.php appears to allow changing the operator user’s role. The first attempt returns Auth key is required. — meaning the backend processes the role change but expects an additional check.
5. Capture the request and try the first auth_key

The request was captured in Burp and the body modified to:
display_name=operator&role=admin&auth_key=bubirsifredirThe goal: use the leaked password to escalate role to admin.
6. Learn the expected format from the error message
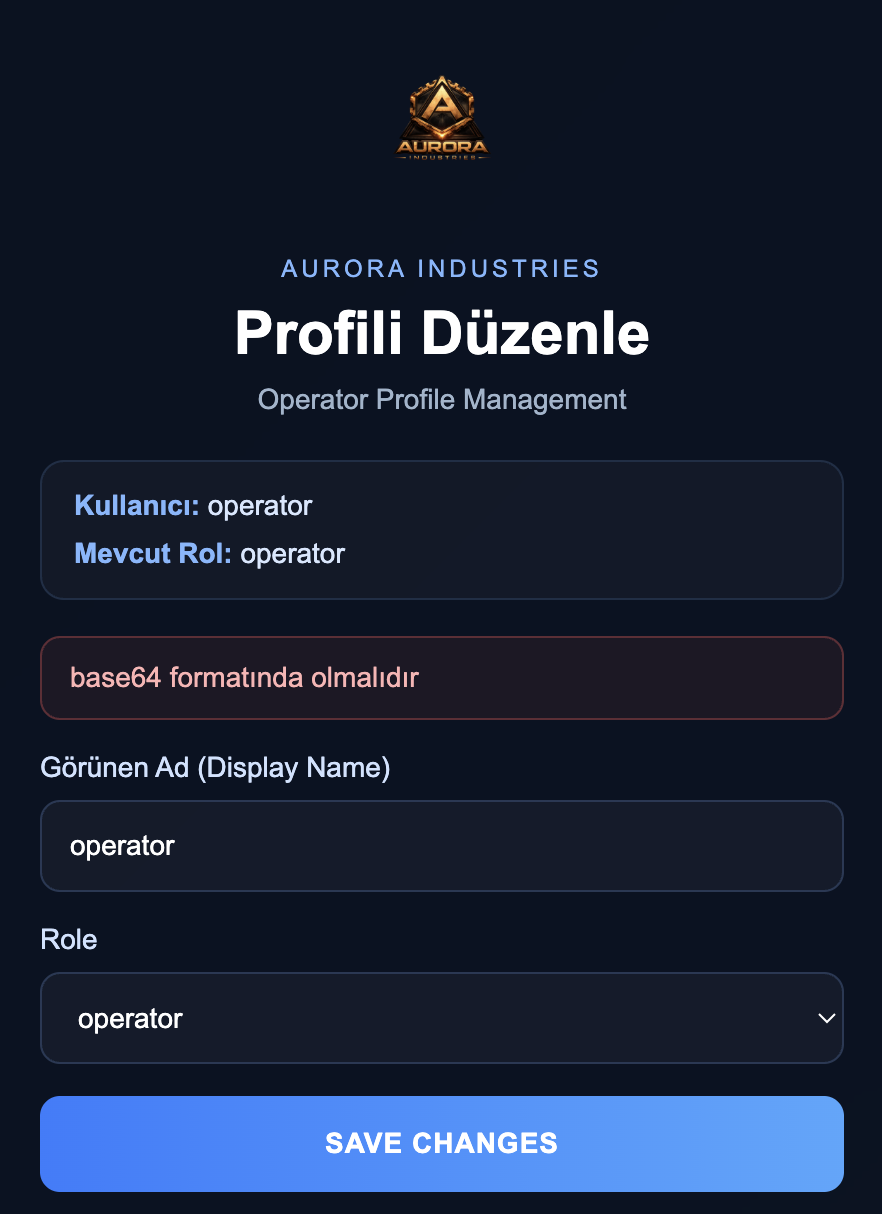
Instead of just saying “wrong value”, the server replies:
must be in base64 formatImplying the auth_key value is logically correct, but needs to be base64-encoded first.
7. Encode the password and resend
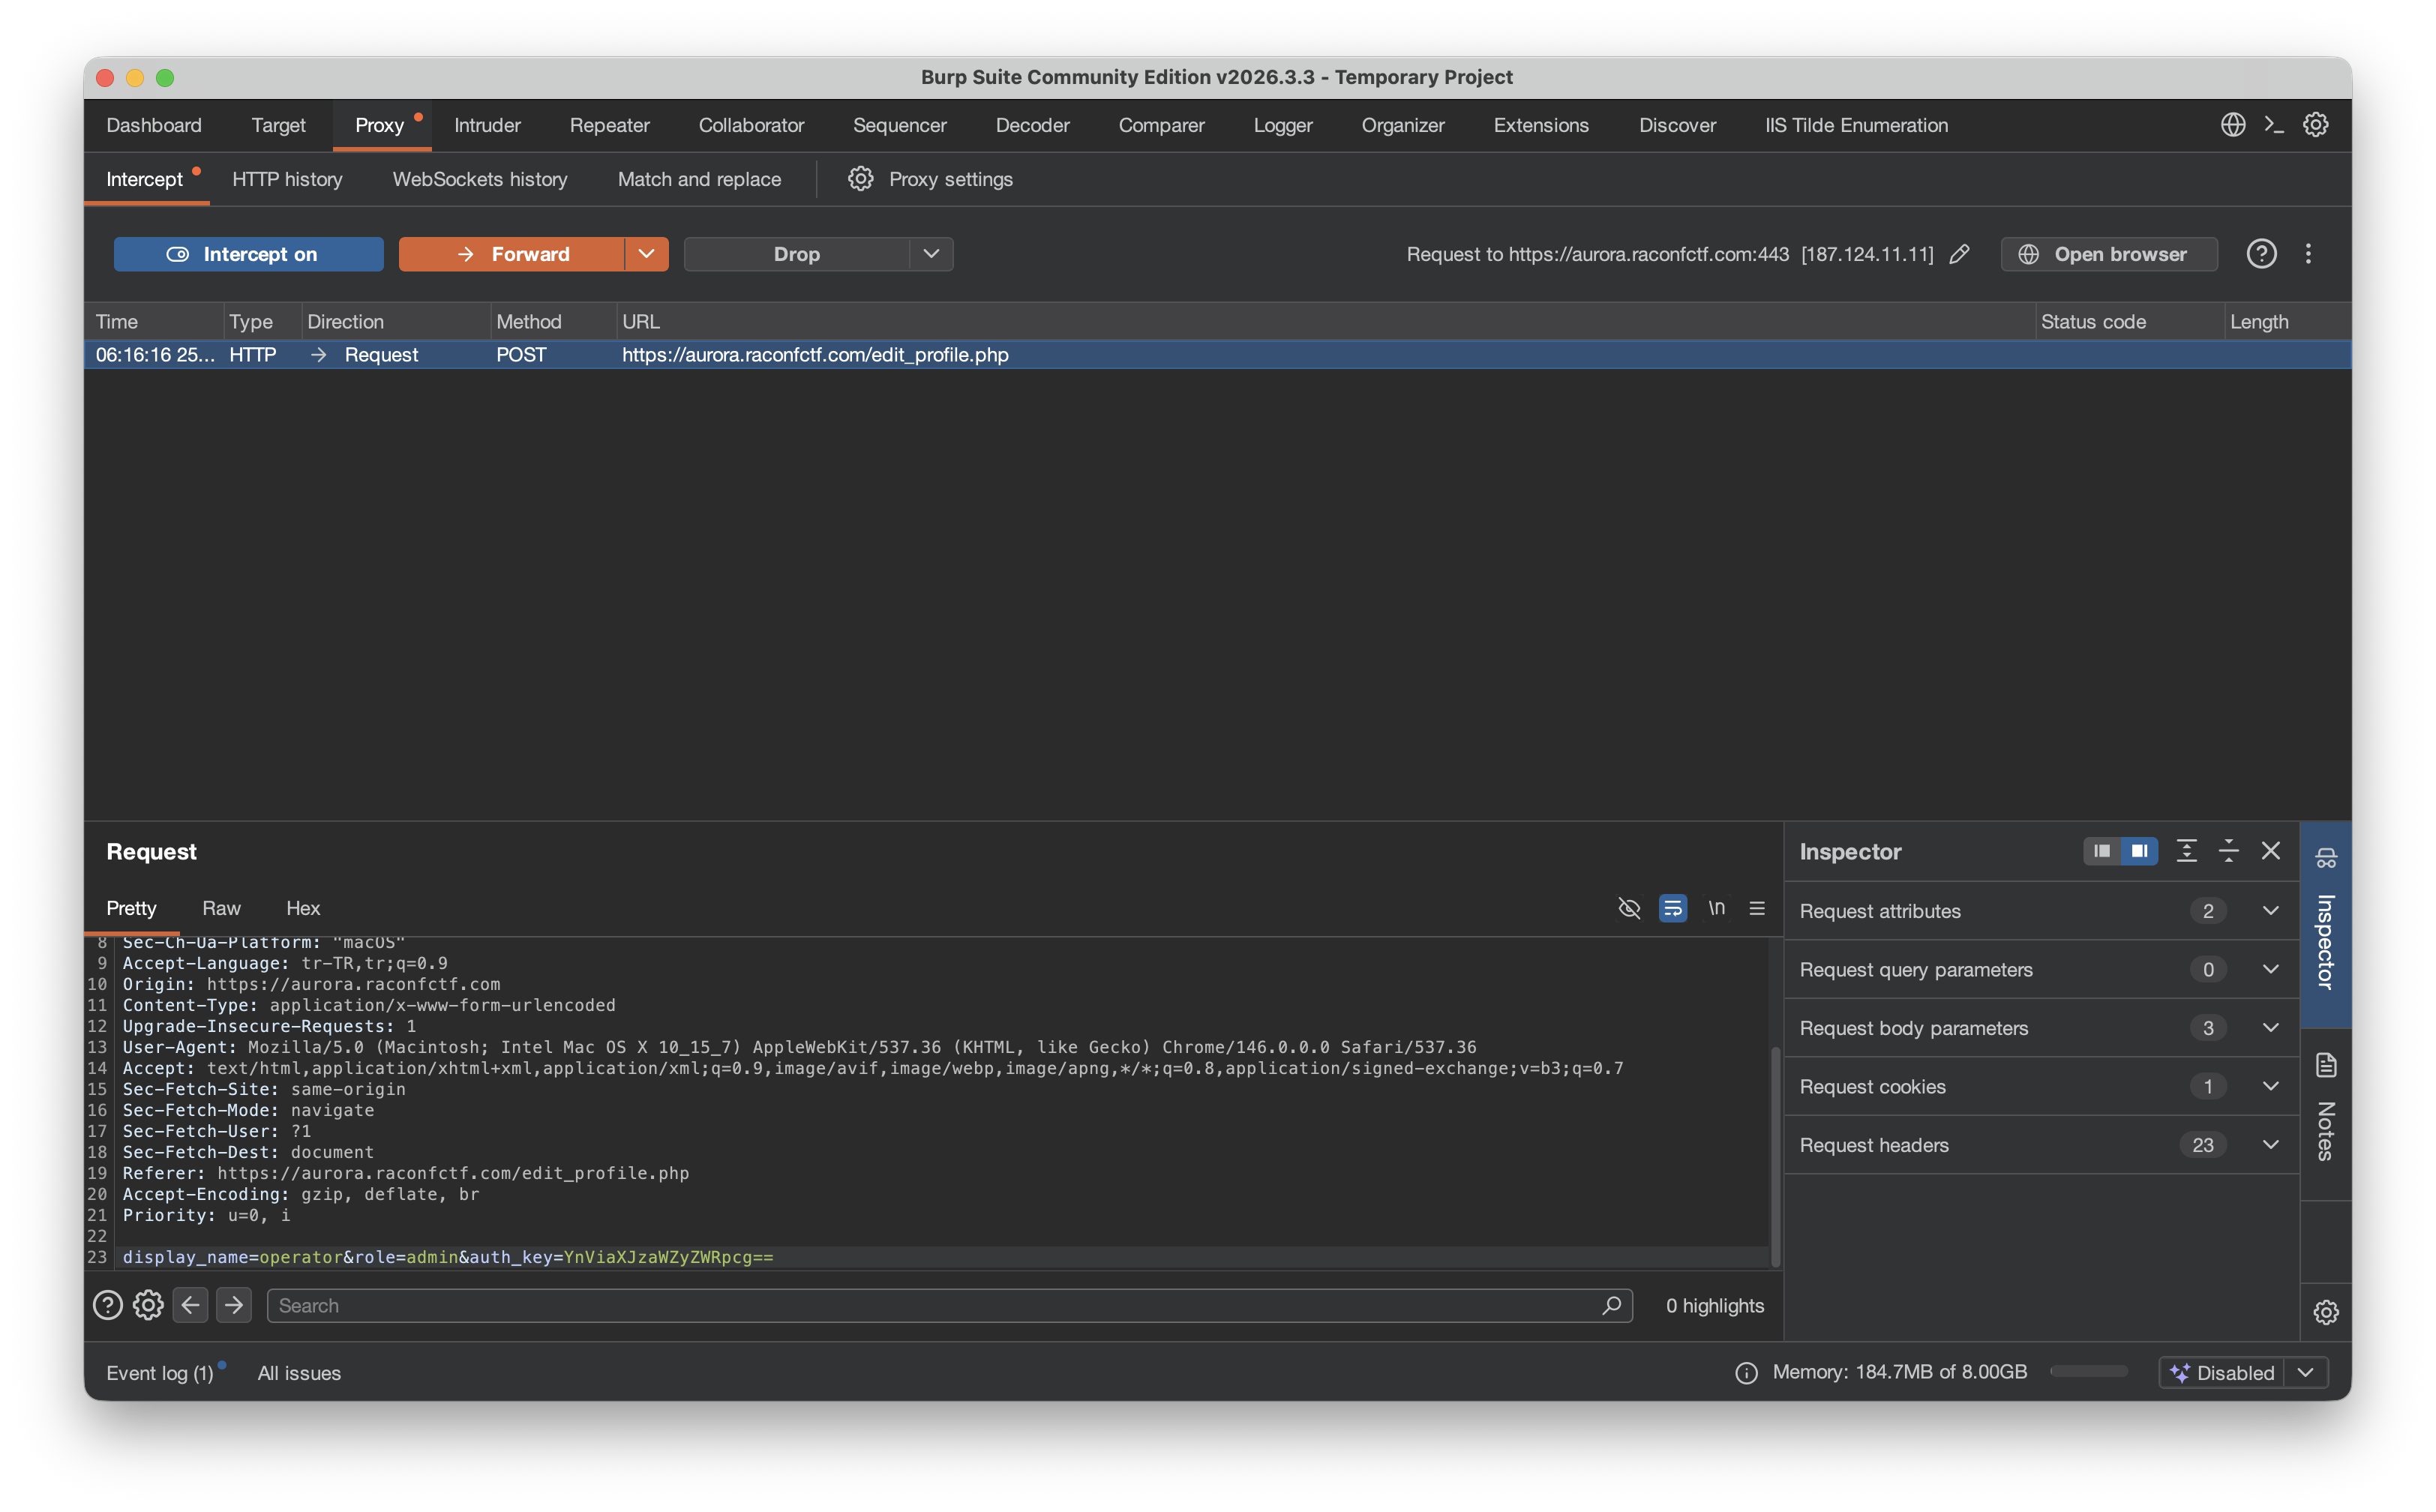
echo -n 'bubirsifredir' | base64Output:
YnViaXJzaWZyZWRpcg==New request body:
display_name=operator&role=admin&auth_key=YnViaXJzaWZyZWRpcg==8. Acquire admin privileges
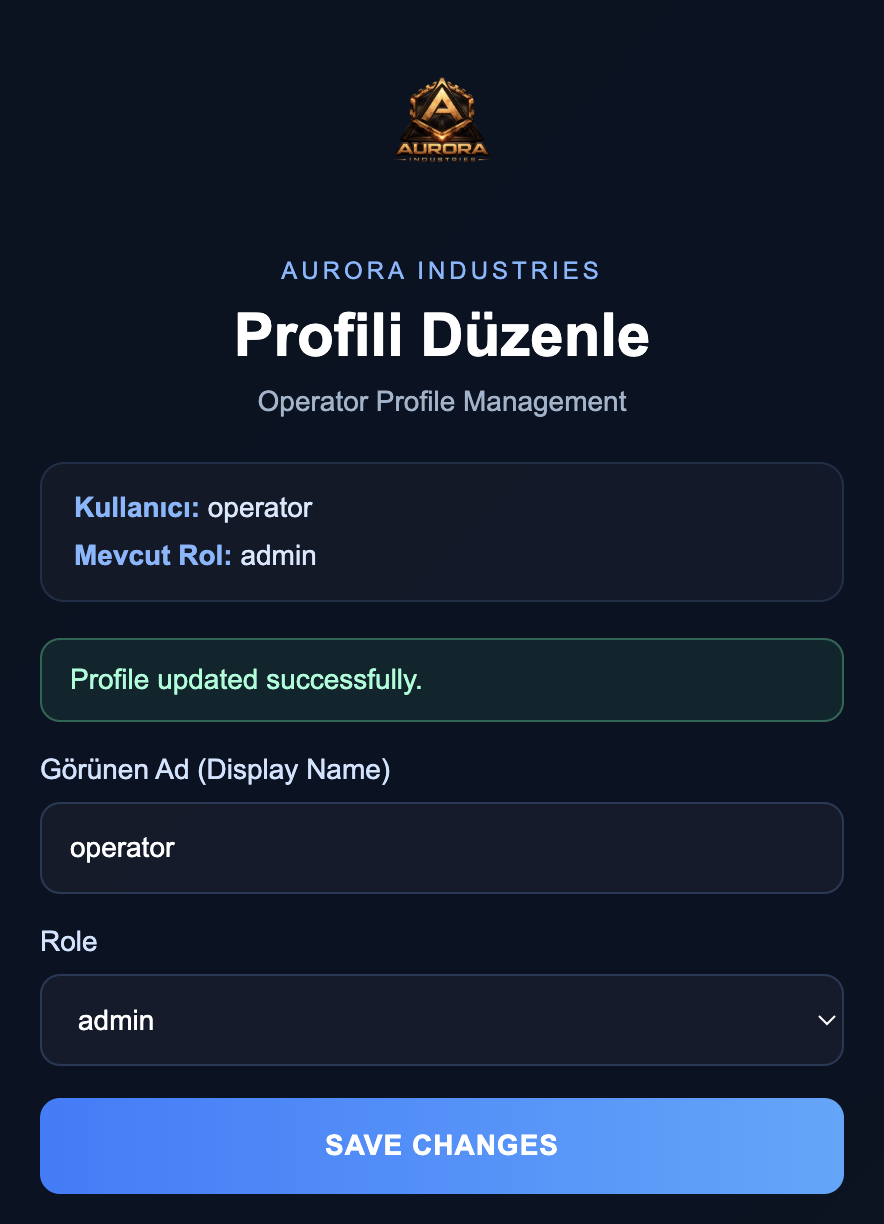
After this request the operator user becomes admin.
Success indicators:
Current Role: adminProfile updated successfully.
9. Inspect the operations panel
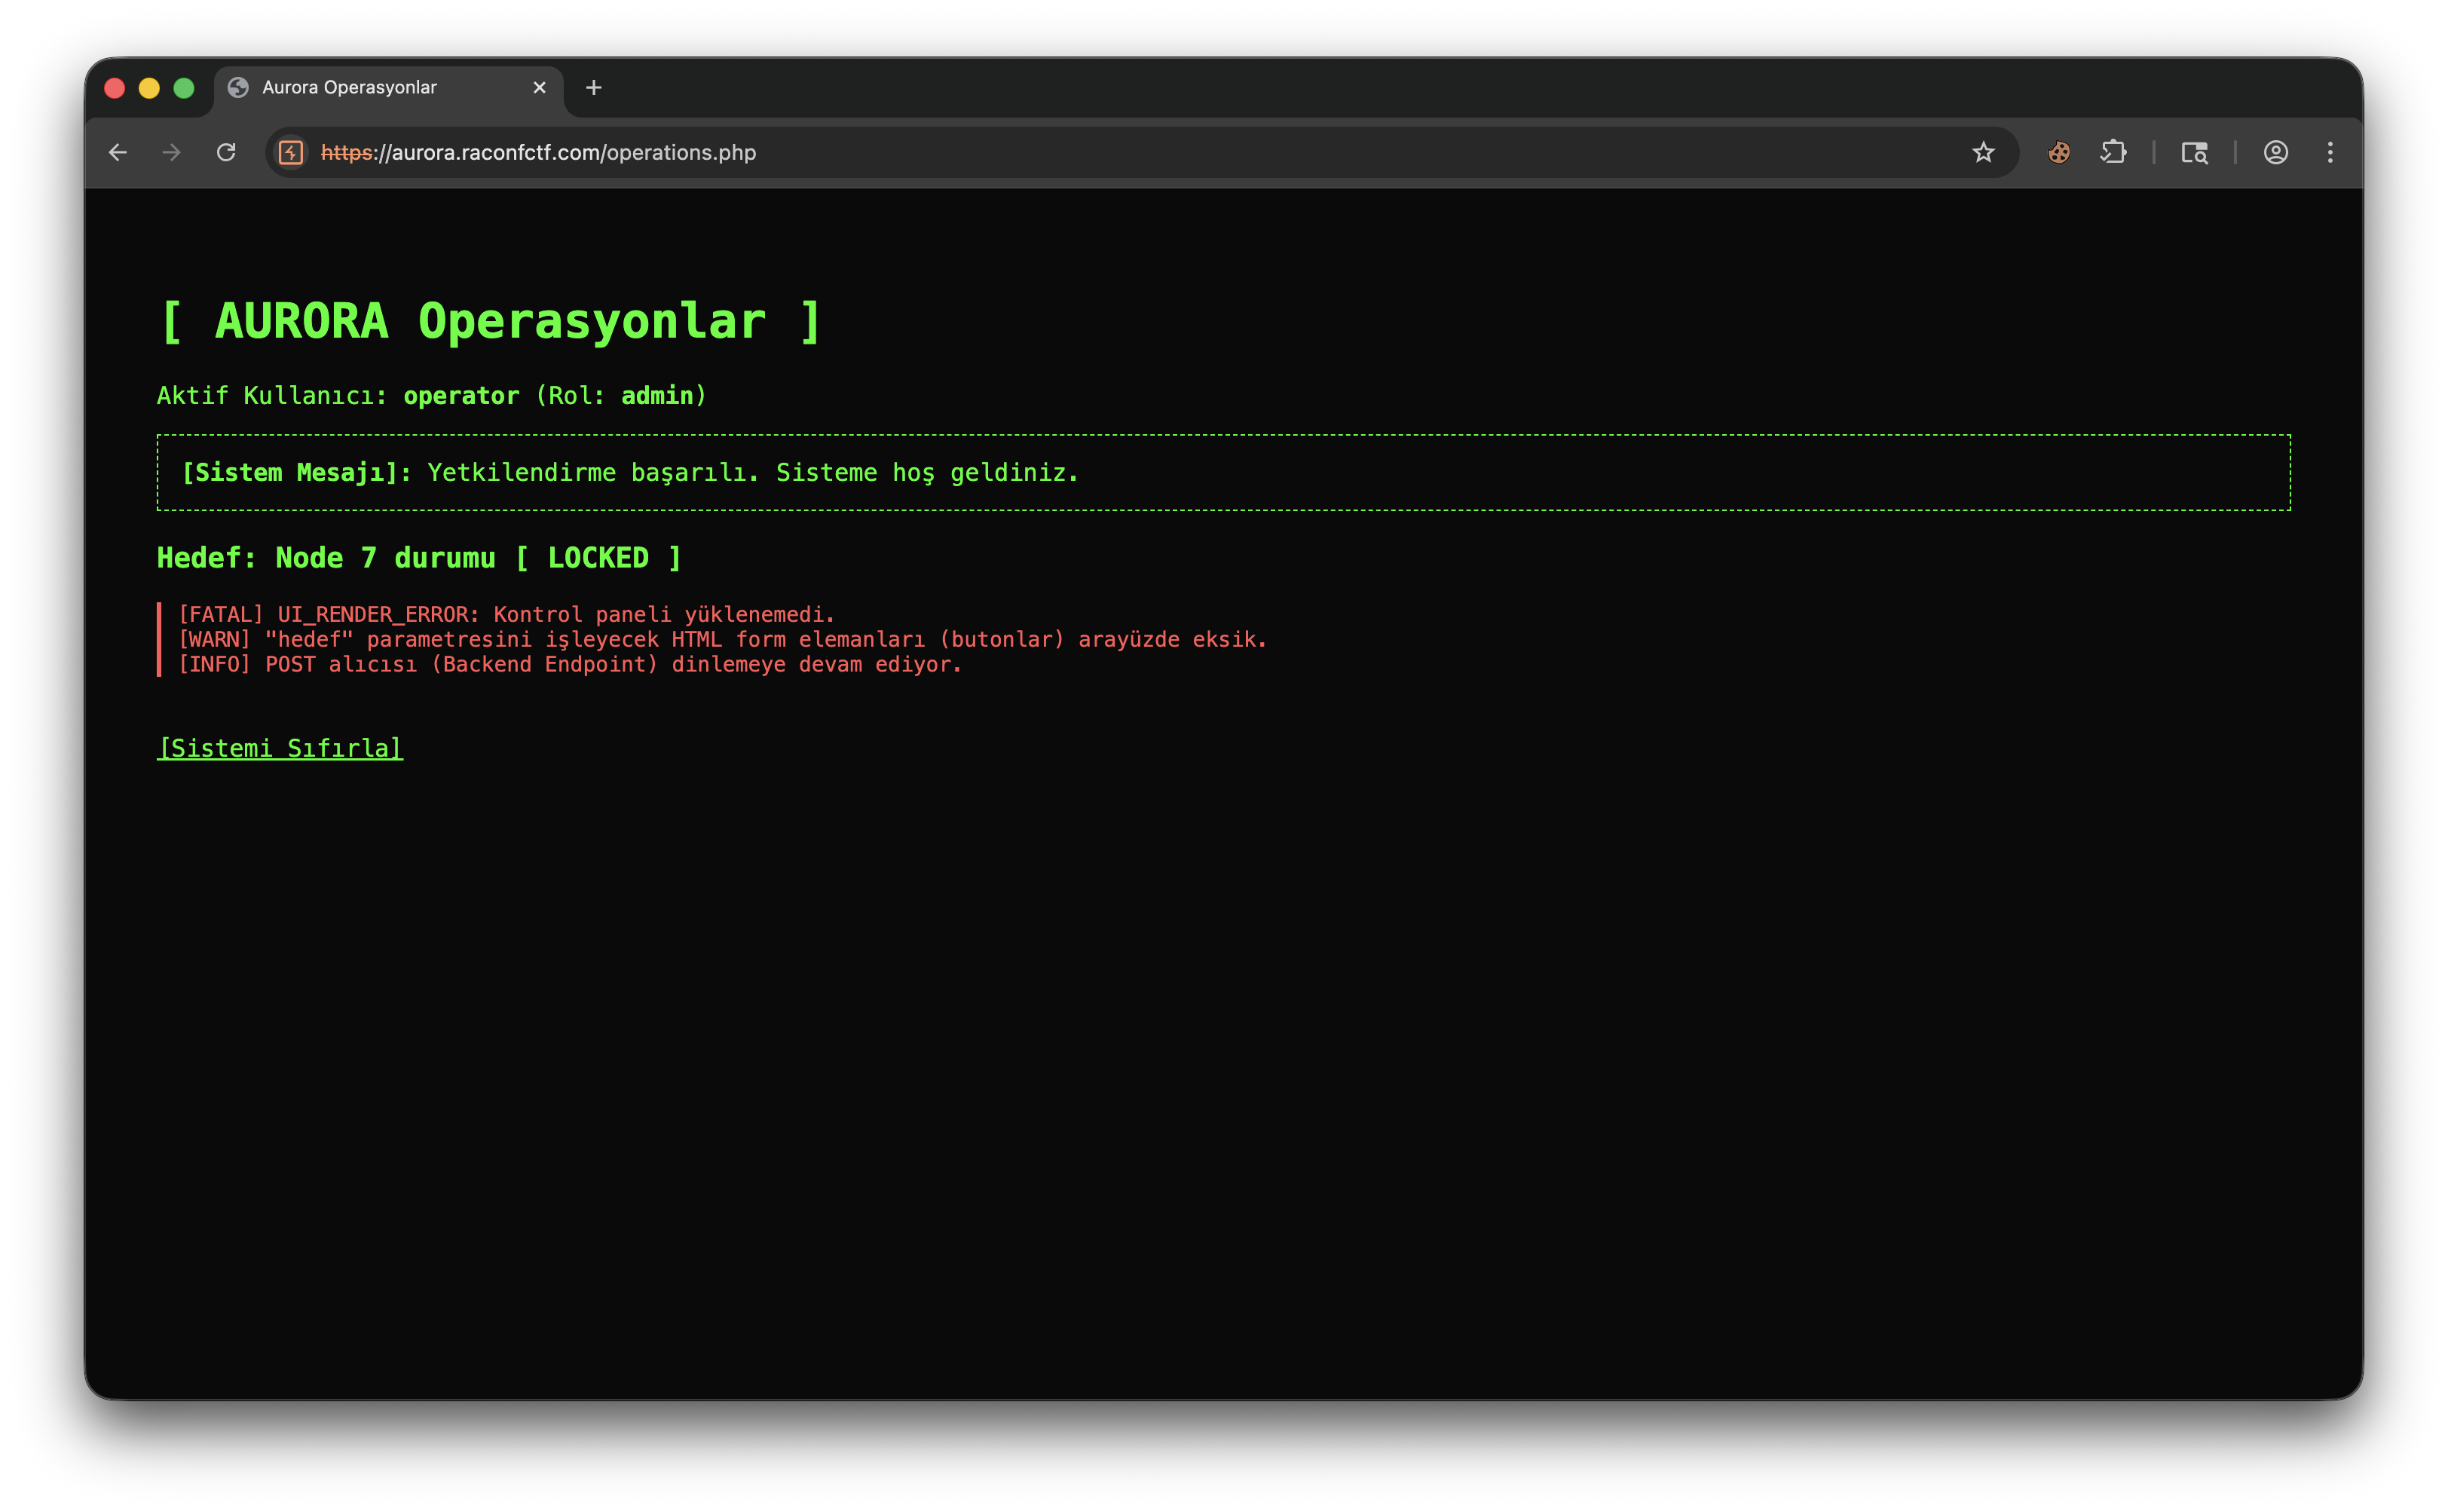
The operations.php view shows:
- active user
operator (Role: admin) - target
Node 7 status [ LOCKED ] POST listener (Backend Endpoint) is still listening.
The UI is broken, but the backend endpoint that triggers the action is alive — the actual vulnerability lies there.
10. Send the POST manually instead of clicking
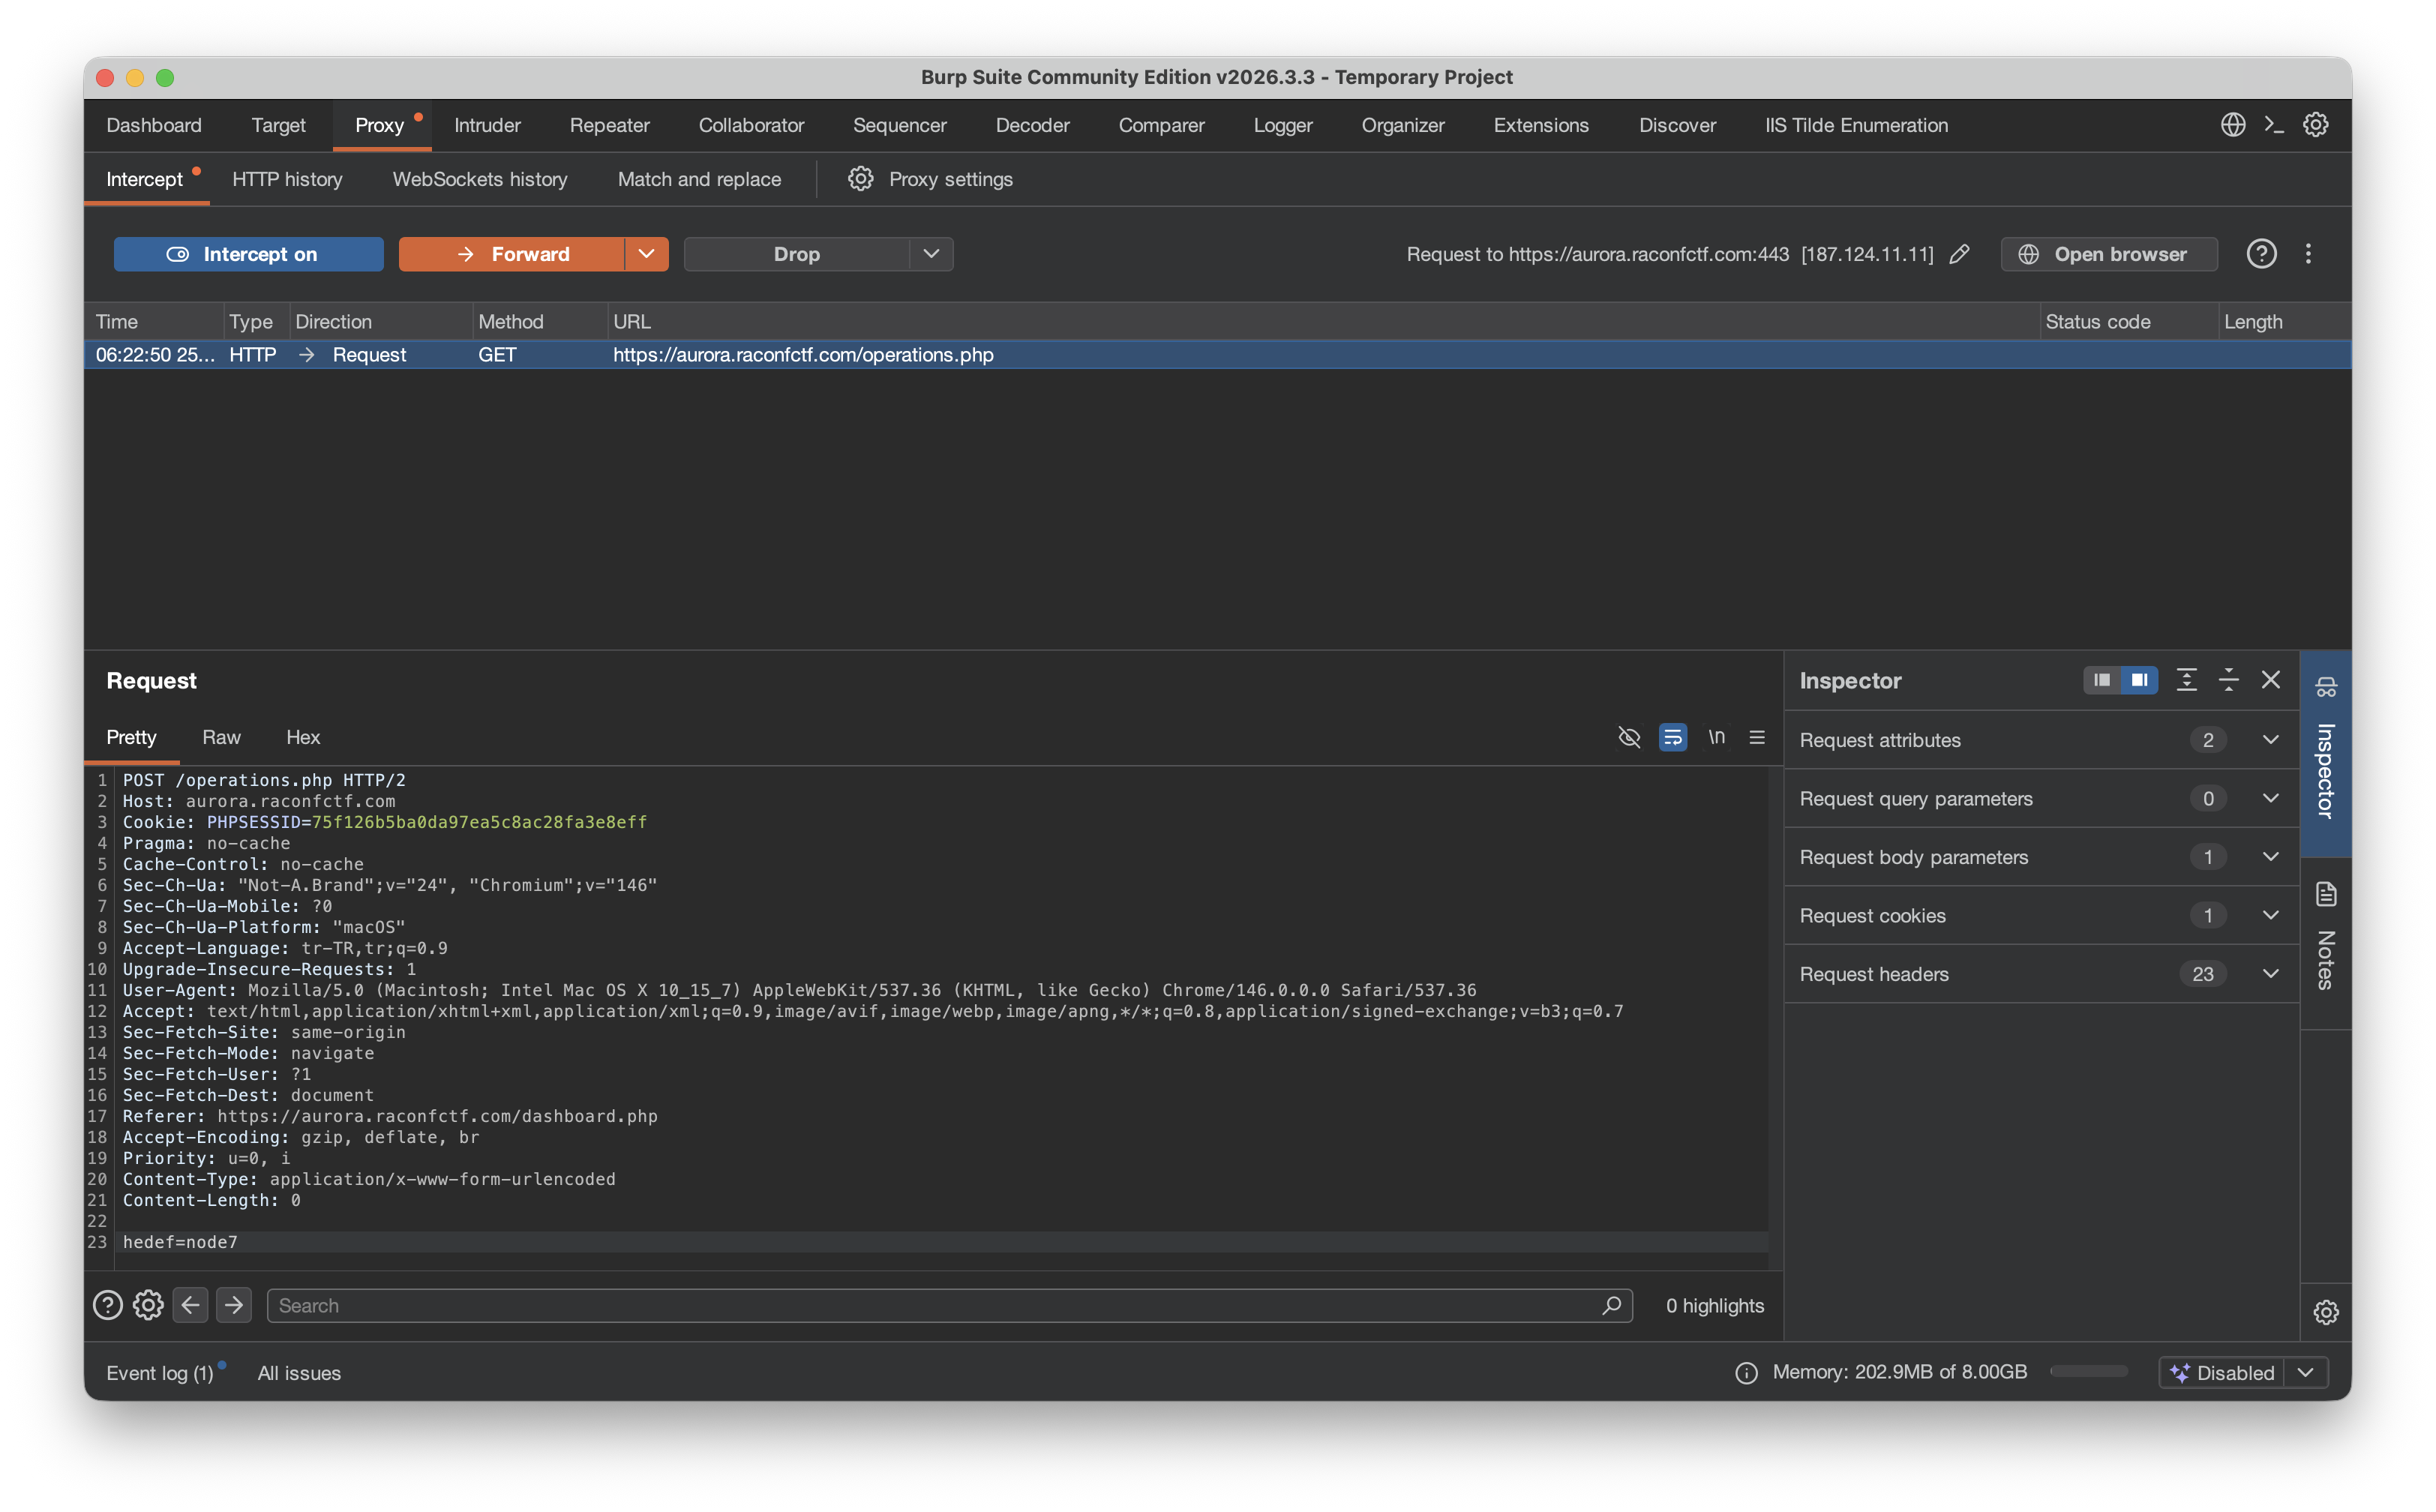
Since the UI doesn’t render the action button, the request is sent through Burp:
hedef=node7This body forces the backend to perform the action the missing button would have triggered.
11. Bring Node 7 online and grab the final output
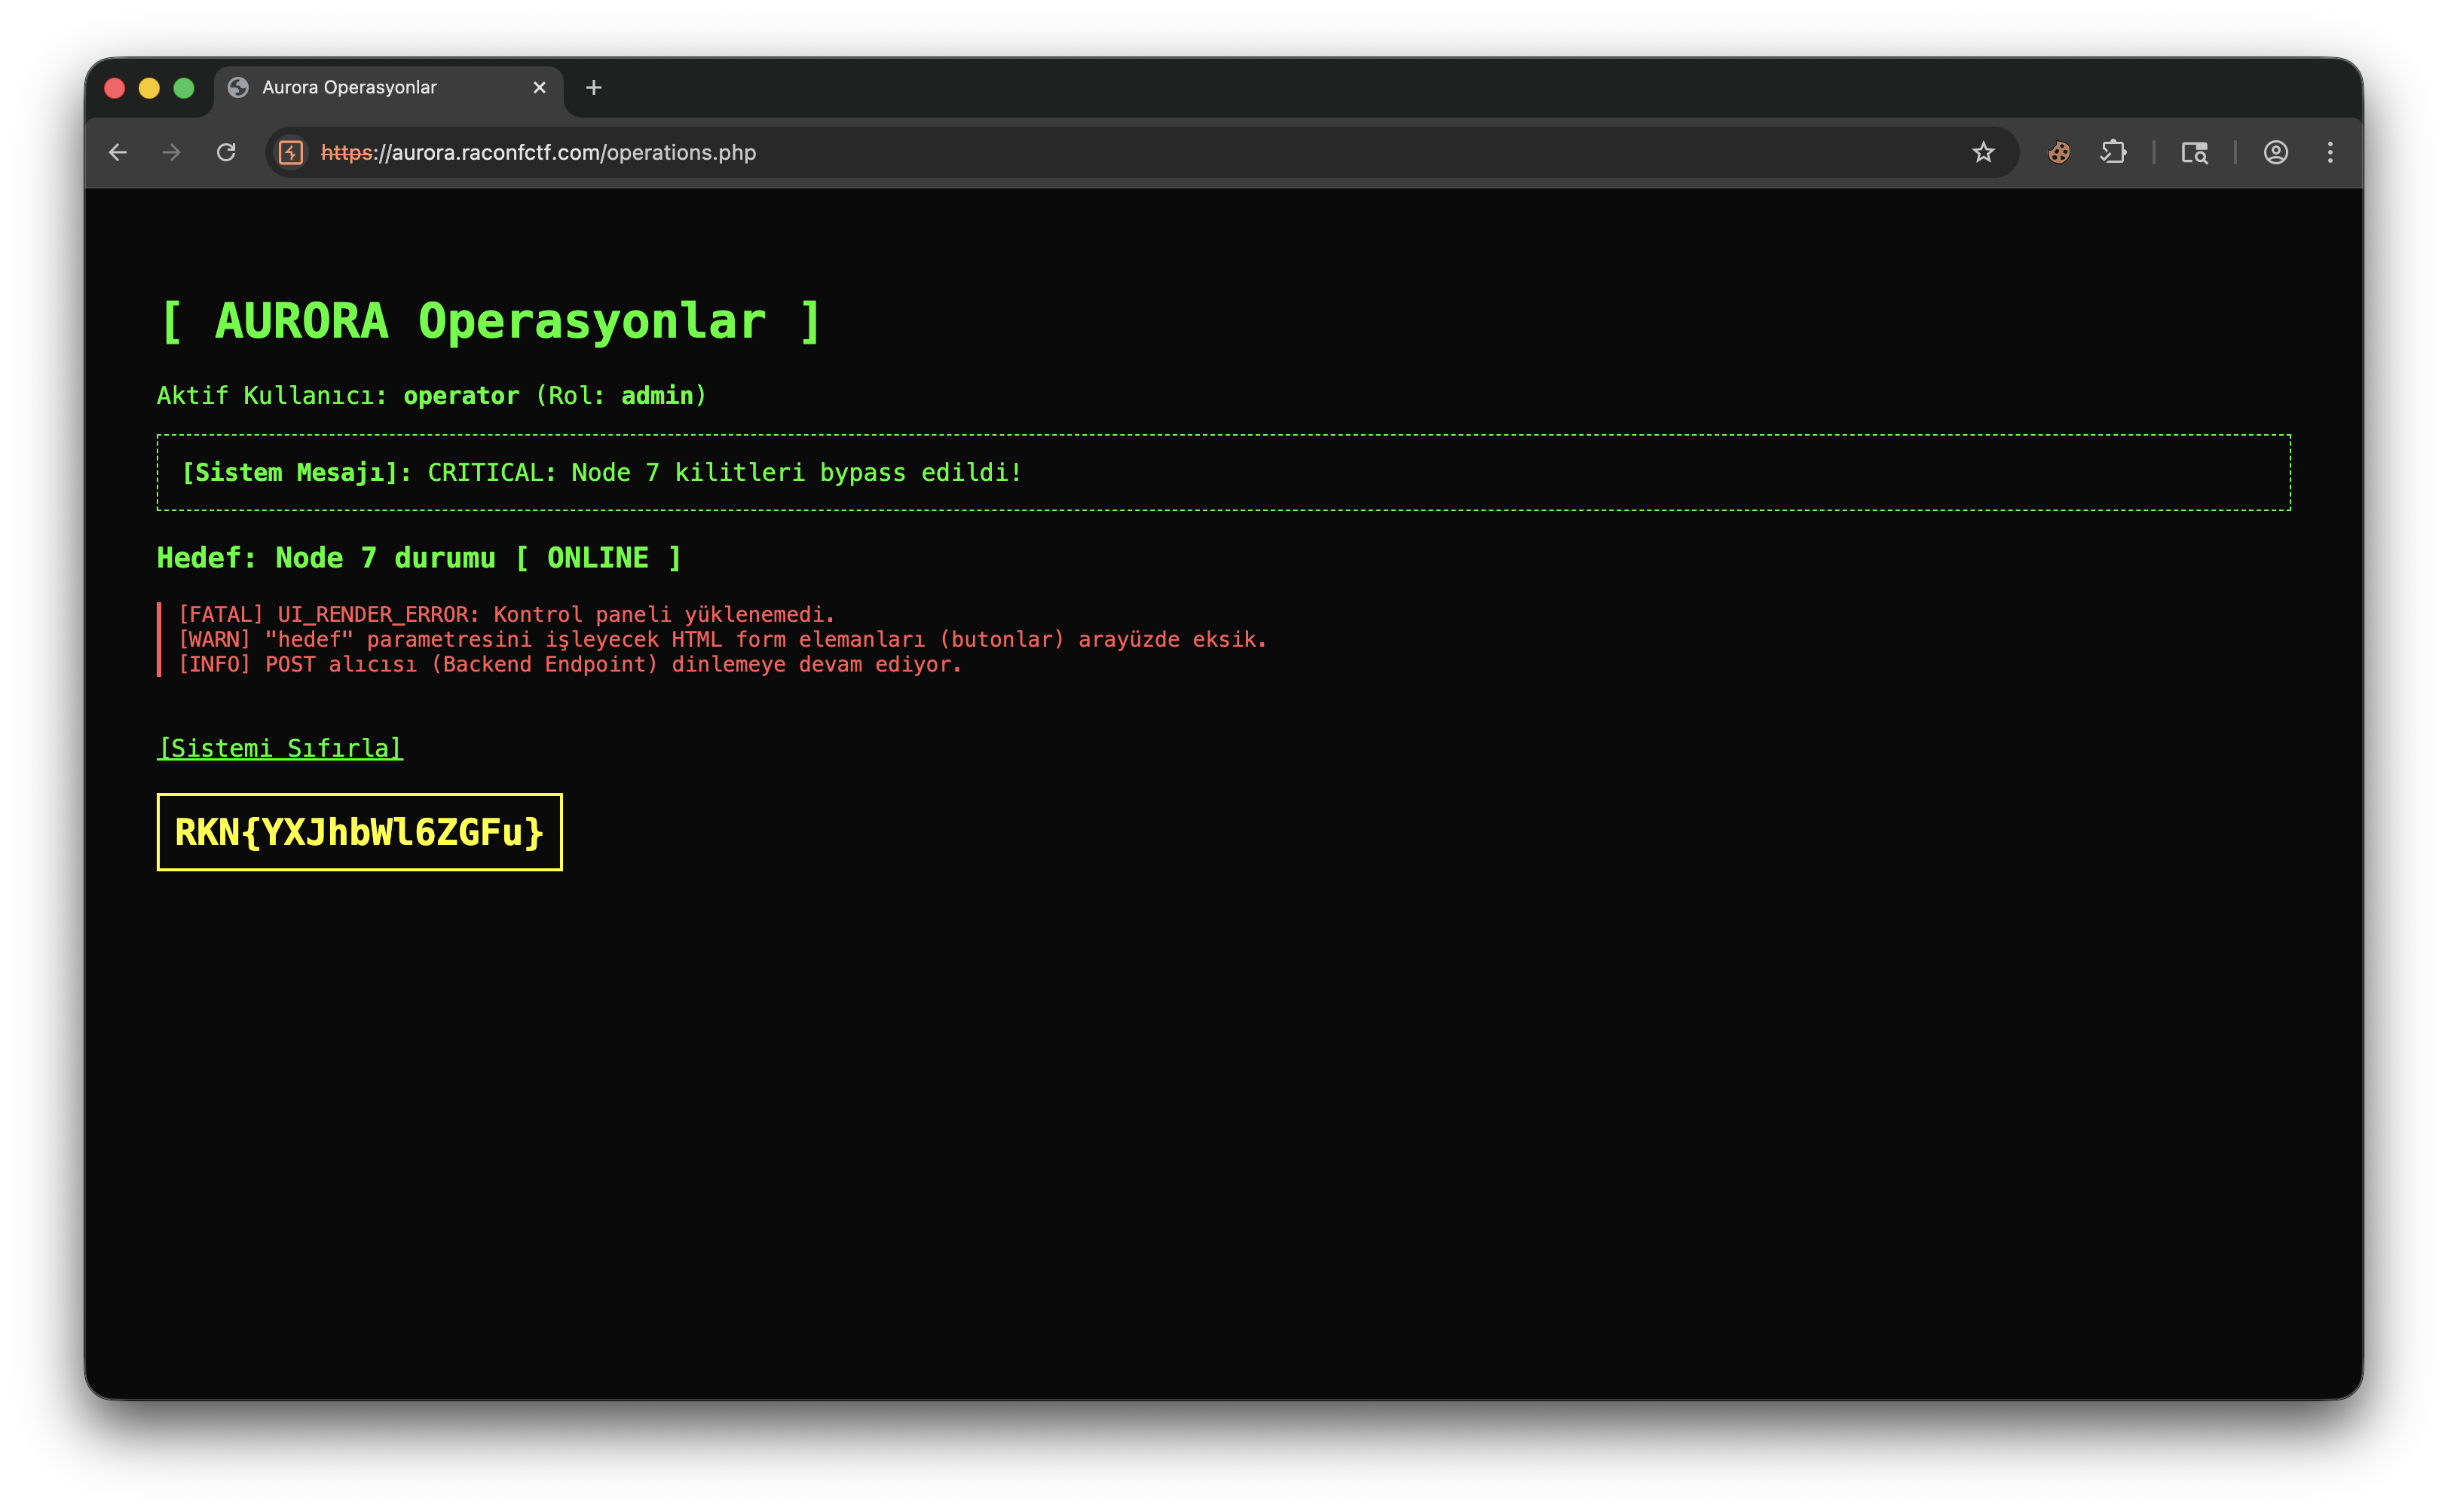
After the request the system prints:
CRITICAL: Node 7 locks bypassed!Status:
Target: Node 7 status [ ONLINE ]Final output on screen:
RKN{YXJhbWL6ZGFu}Conclusion
The vulnerability chain in this challenge:
- Fallback view left publicly accessible
- Sensitive data exposed via leaky logs
- Insufficiently protected role-update endpoint
- Operation backend kept open despite a broken UI
Practical recap:
password = bubirsifredir
auth_key = YnViaXJzaWZyZWRpcg==
POST /operations.php
hedef=node7
Final output: RKN{YXJhbWL6ZGFu}
02 — Nova Media Network
An OSINT chain connecting social-media trails to open-source crumbs — from an X account, to a Spotify reference, to a deleted GitHub commit, and finally to image metadata.
Goal
Starting from the hint astro_jou761, find the EXIF field where the flag is hidden.
Quick Summary
- Find the
astro_jou761X account. - The post on that account references
Space Oddity. - That keyword leads to the GitHub repo
major-tom761/space-oddity. - The commit history reveals a deleted image file.
- The image is recovered from a parent revision and inspected via EXIF.
- The flag appears in the
Authorfield.
Step by Step
1. Find the astro_jou761 account
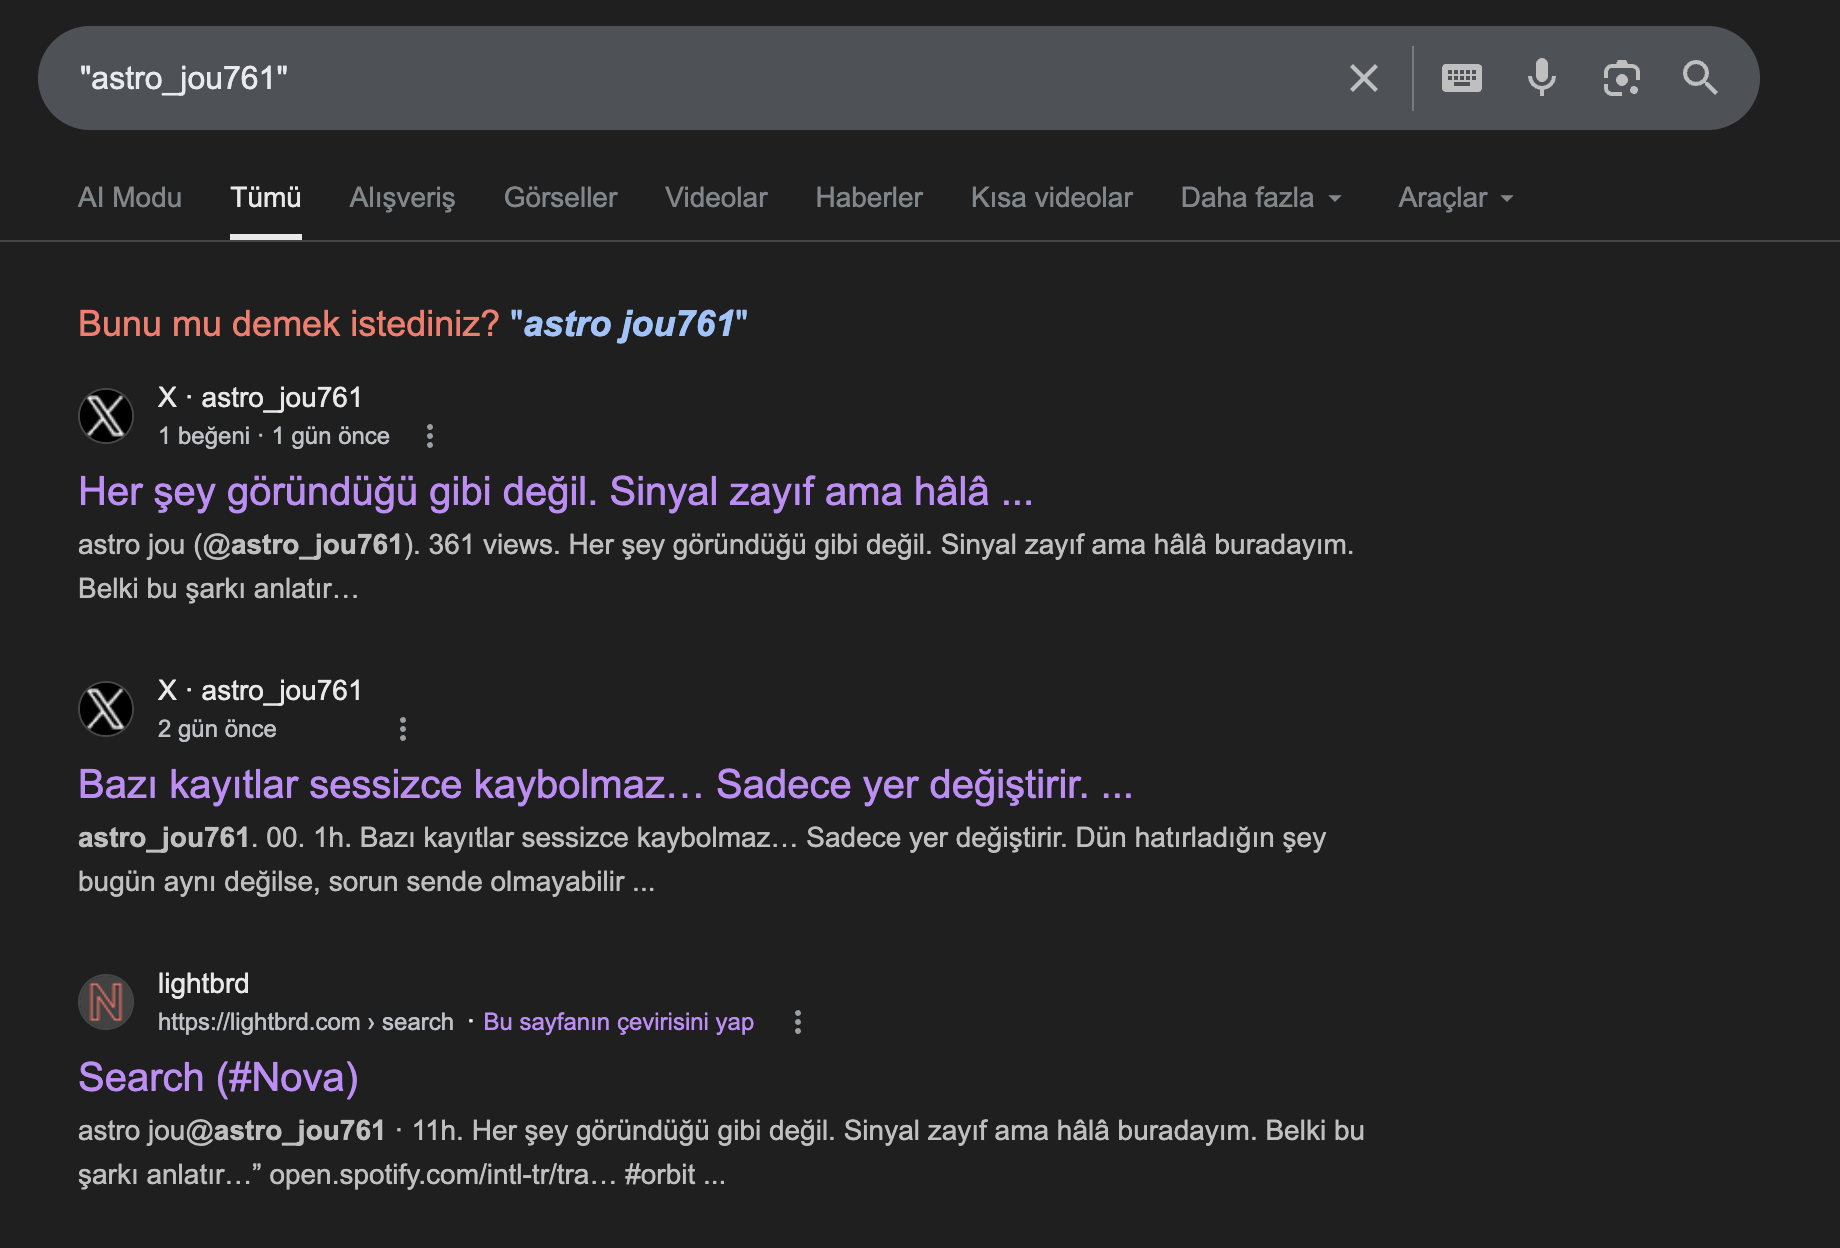
A search for astro_jou761 surfaces X posts under the same handle. Notable detail:
- post text: “Nothing is what it seems. The signal is weak, but I’m still here.”
This account is the first concrete OSINT pivot in the chain.
2. Follow the hint inside the X post
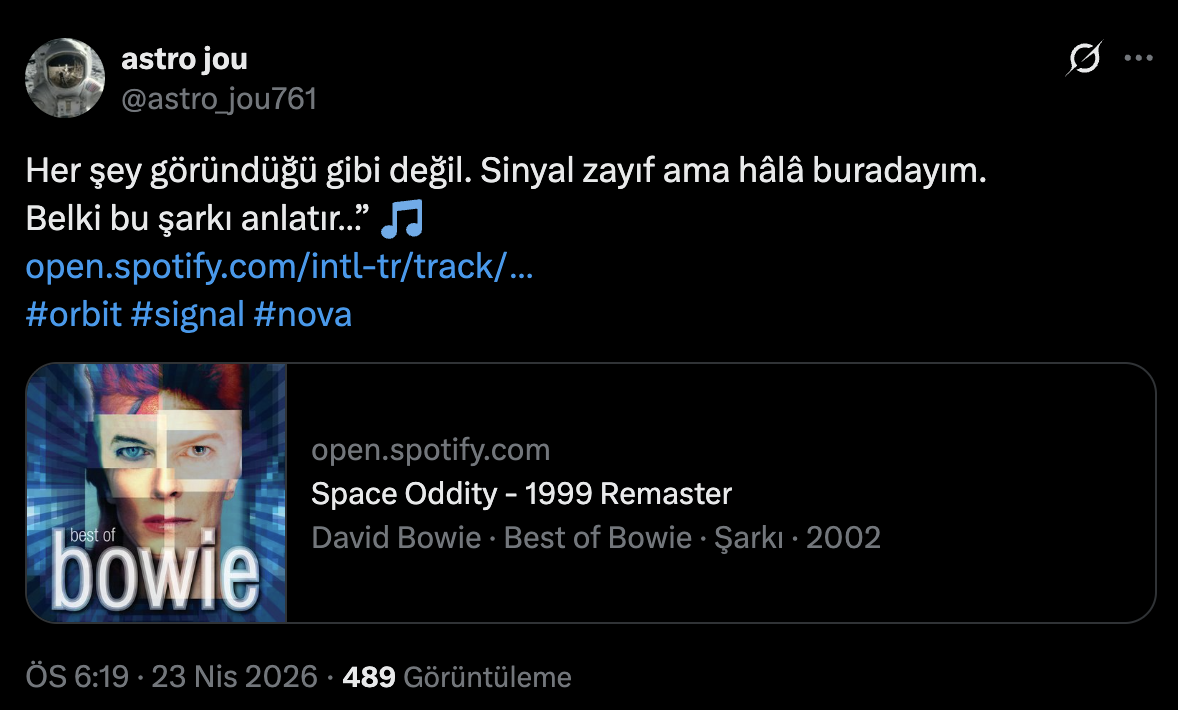
The post links to a Spotify track titled Space Oddity - 1999 Remaster. Hashtags: #orbit #signal #nova.
The key clue is direct — Space Oddity. Time to search using that title.
3. Pivot to GitHub via Space Oddity

Searching for Space Oddity on GitHub surfaces the major-tom761/space-oddity repo:
- The repo name matches the song title from the post
- The username
major-tom761matches theMajor Tomreference in the lyrics
The challenge has now bridged from the social-media hint to an open-source artifact.
4. Inspect repo contents
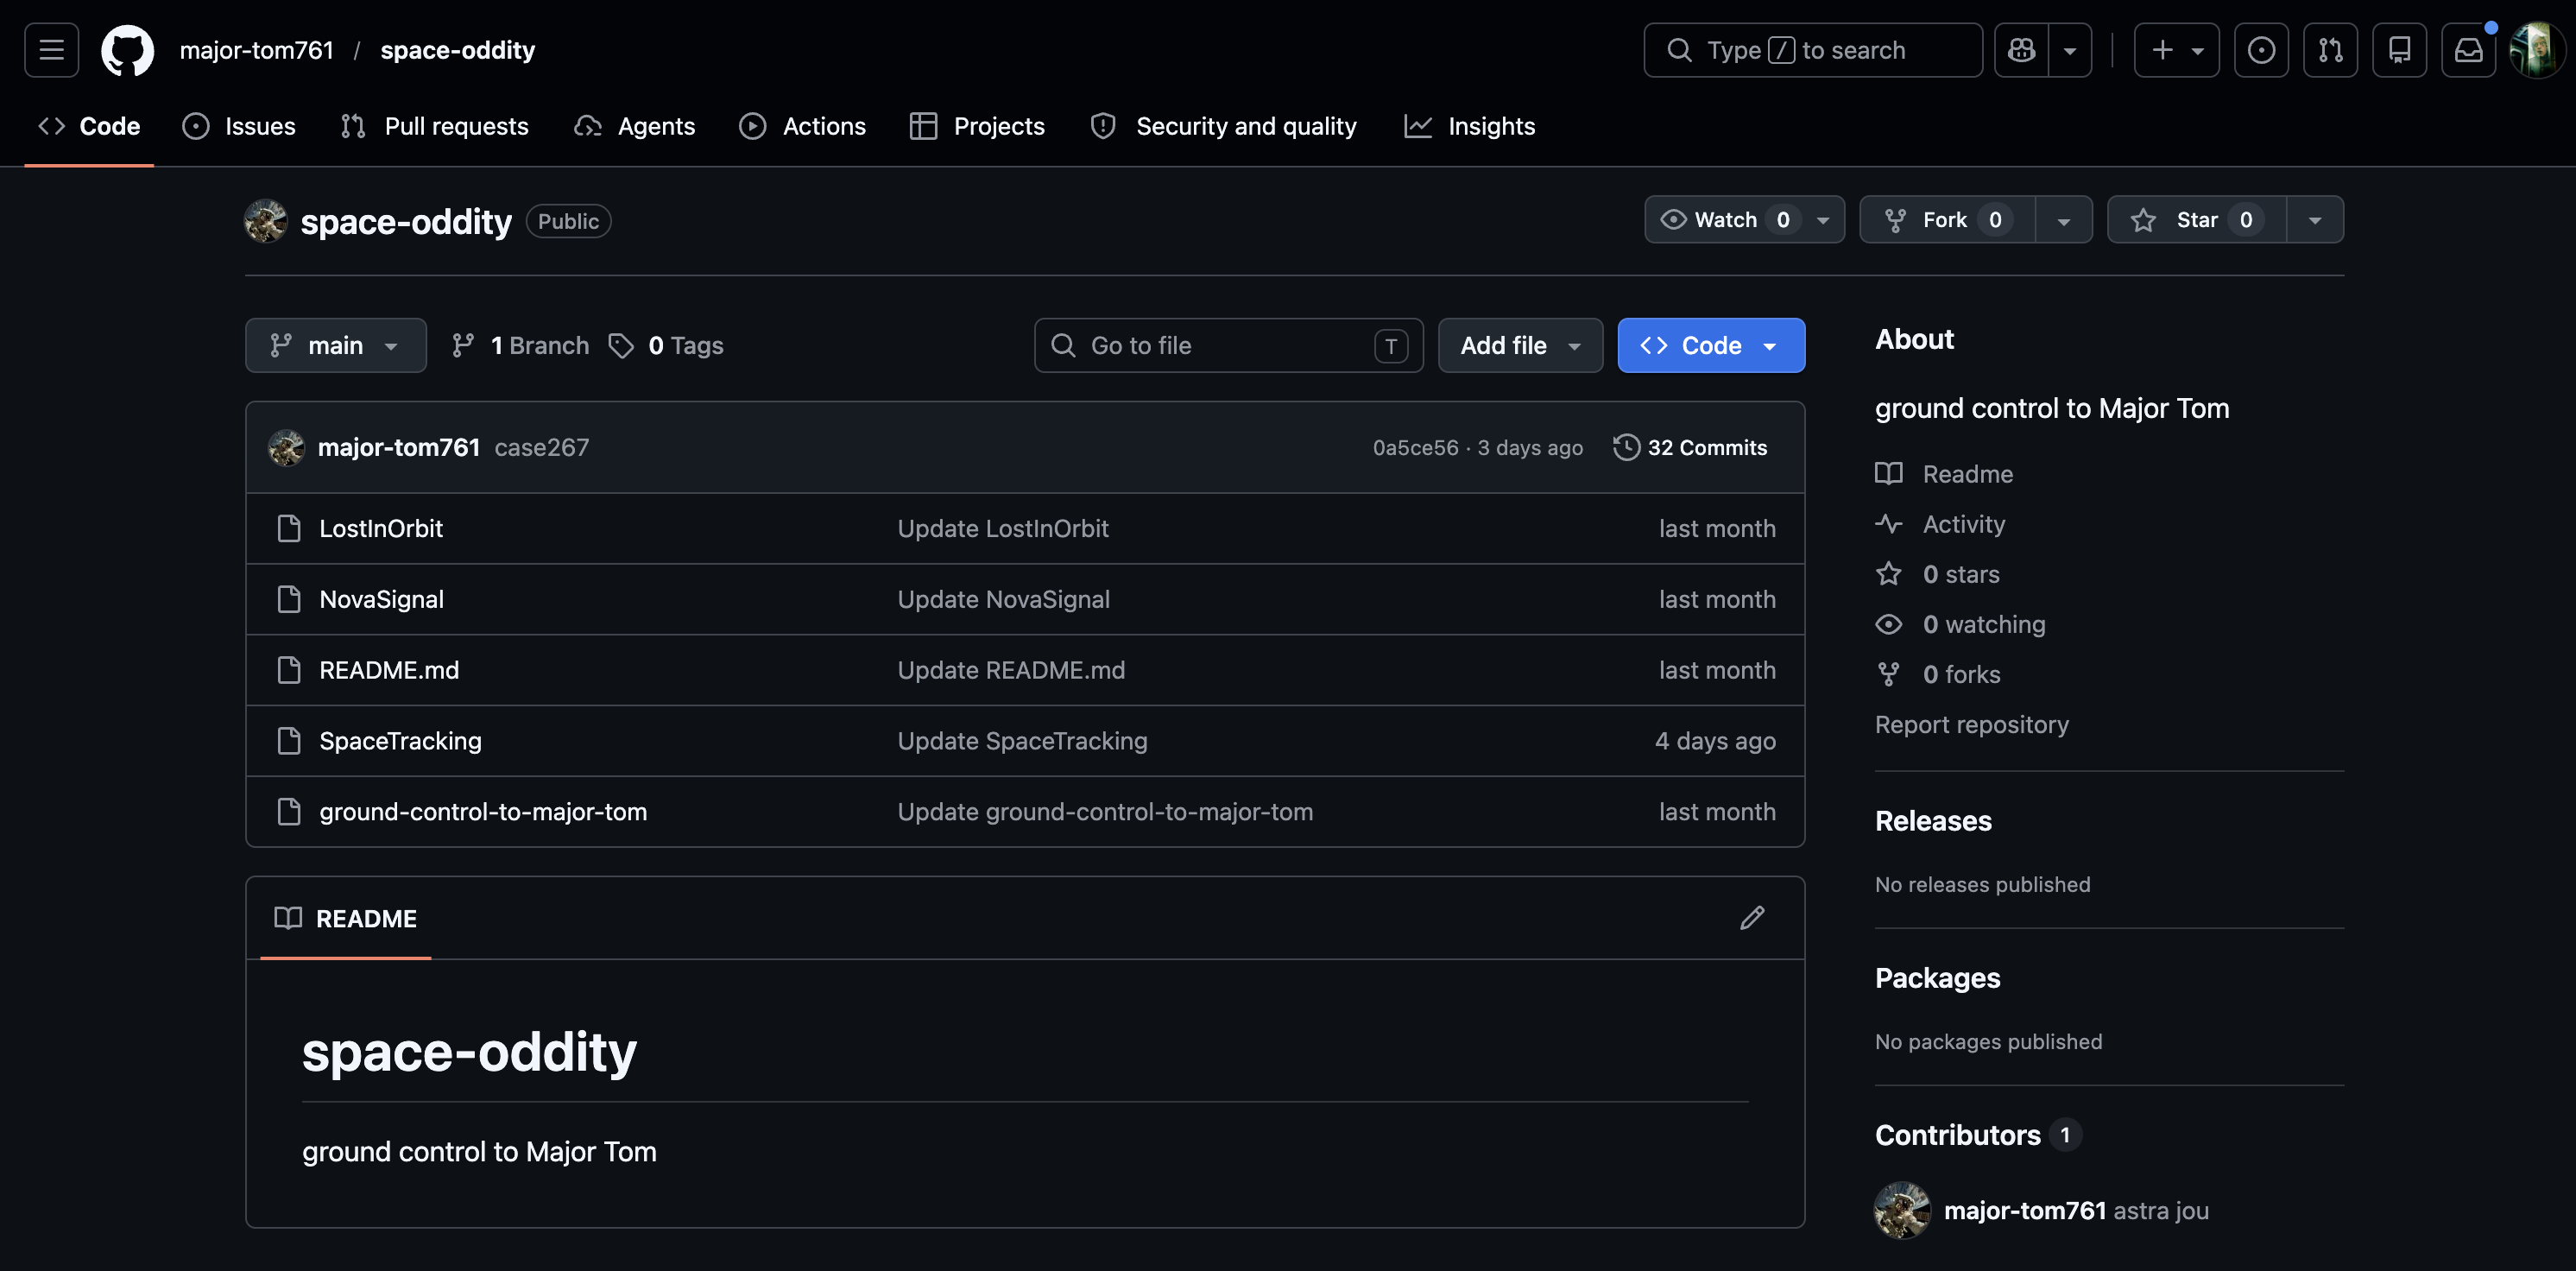
Files in the repo: LostInOrbit, NovaSignal, README.md, SpaceTracking, ground-control-to-major-tom. Names continue the same theme.
The next sensible step is the commit history — in this kind of challenge, the flag often hides in deleted content or an older revision.
5. Find the deleted file in commit history
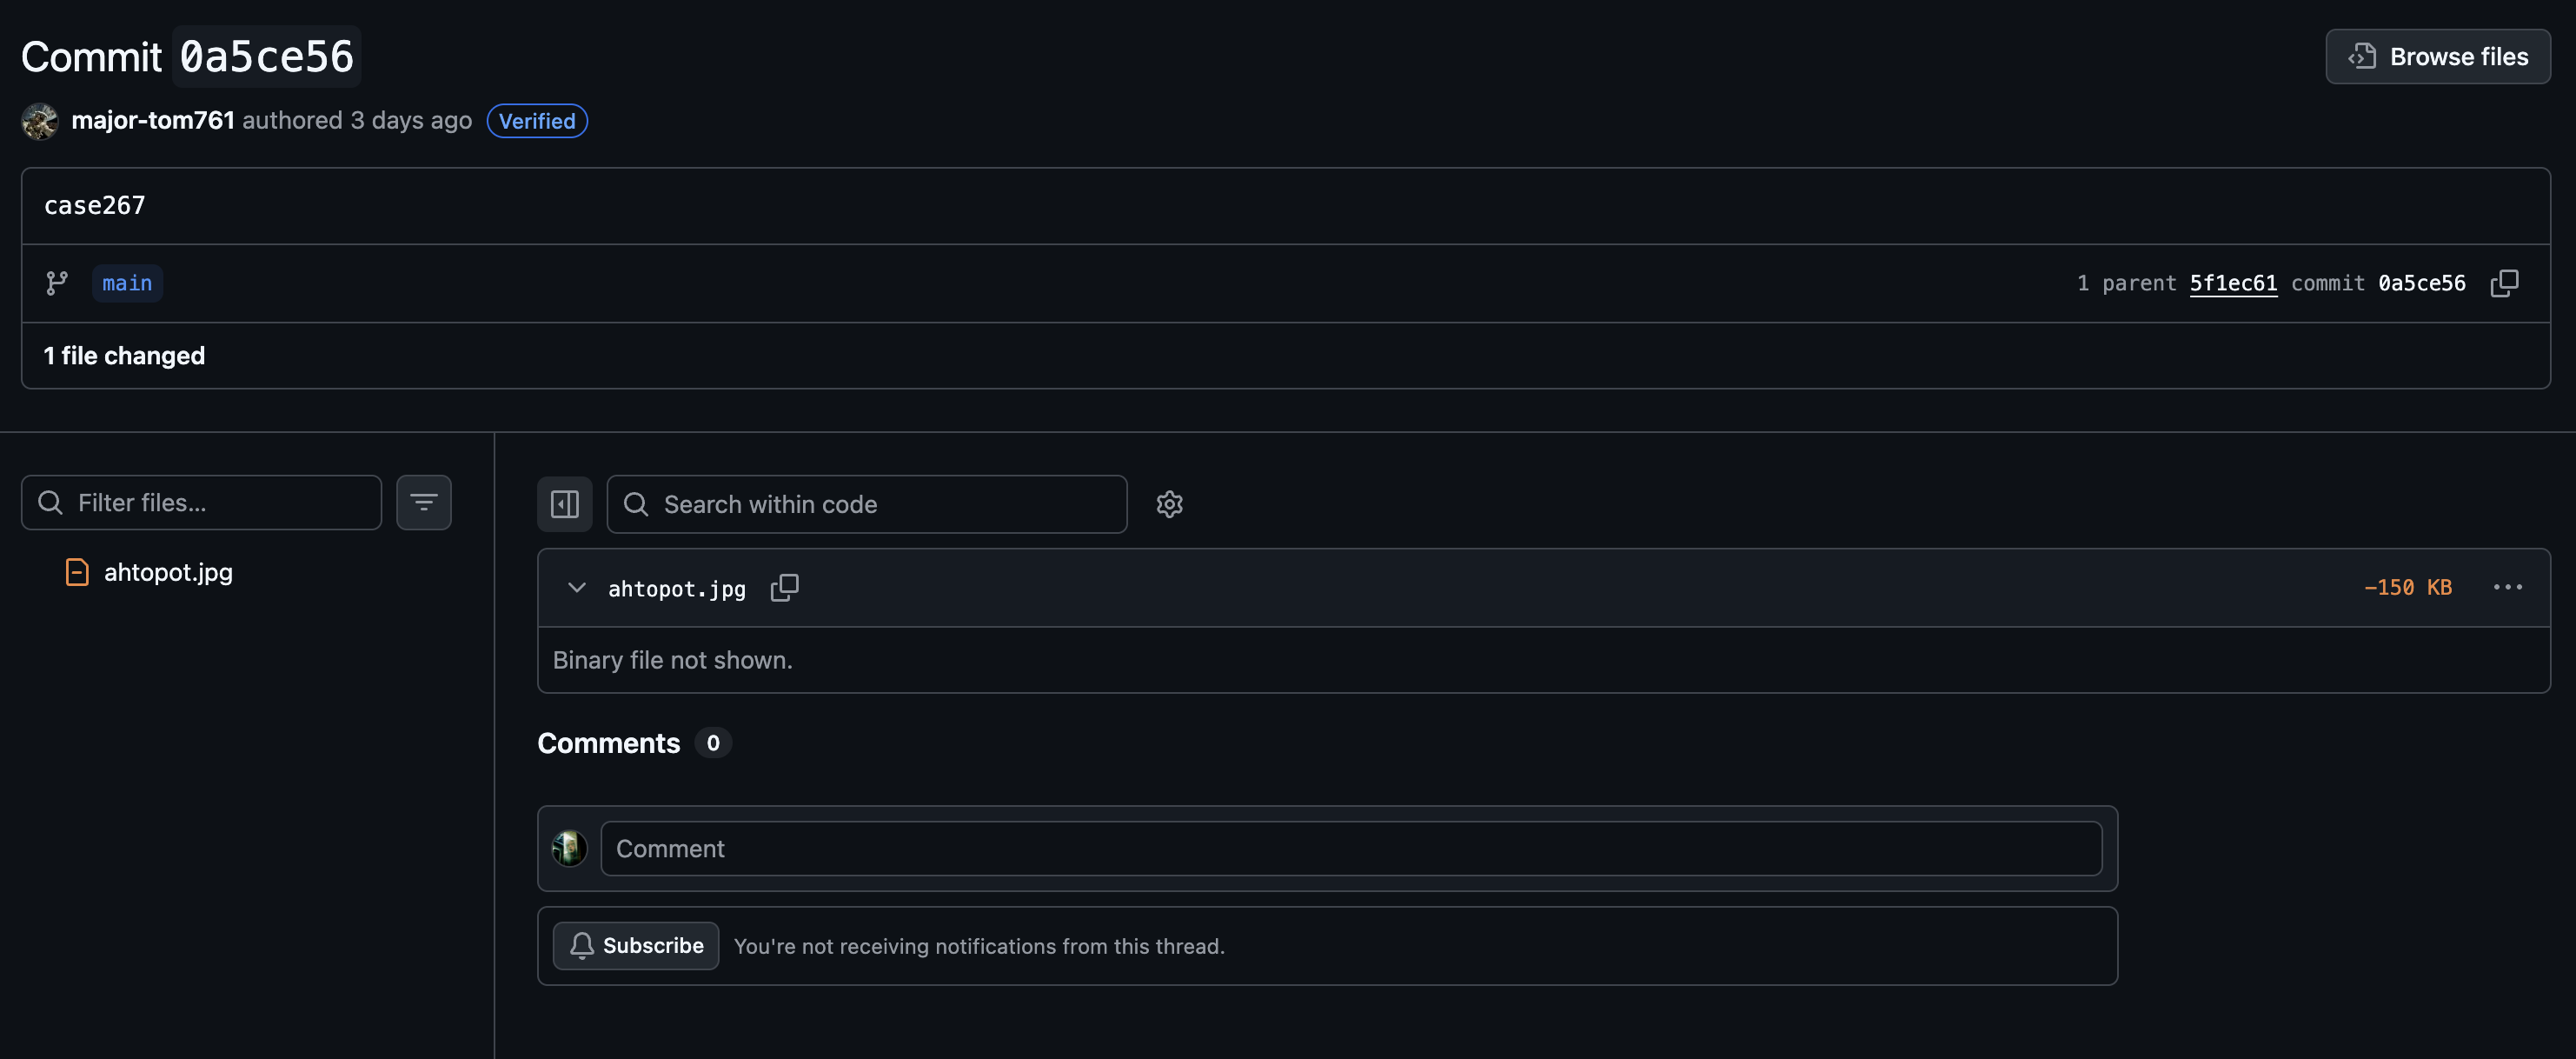
Commit 0a5ce56 contains a single change: deletion of ahtopot.jpg (-150 KB). The file isn’t present on the live branch, but it can be recovered via the parent revision.
6. Recover the deleted image and inspect it

After recovering ahtopot.jpg from the older commit, we see it’s a photo of an octopus. The image alone doesn’t yield the flag — next step: EXIF metadata analysis.
Tools used: exiftool, strings, hex inspection if needed.
7. Extract the flag from EXIF metadata
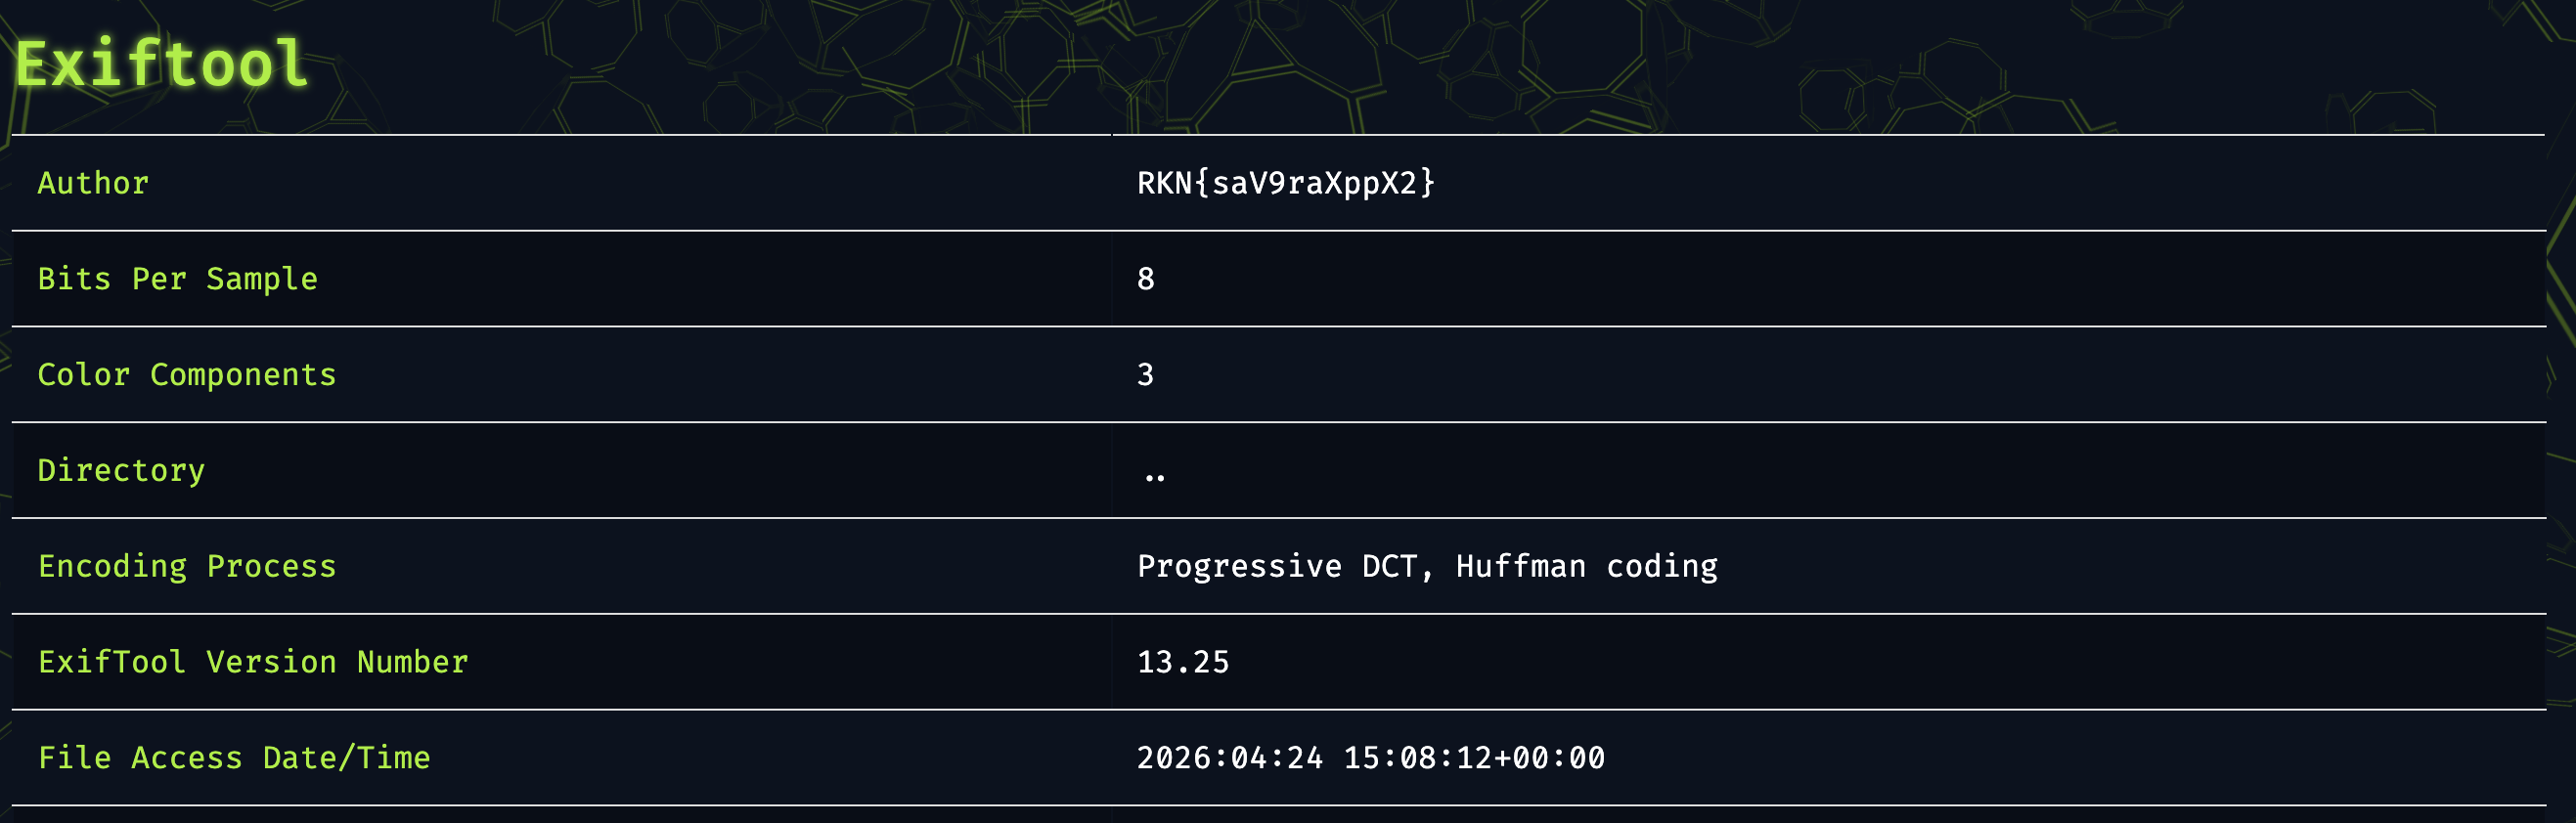
In the exiftool output:
Author: RKN{saV9raXppX2}The flag is embedded directly in the image’s Author EXIF field.
Conclusion
Each link in the chain follows from the previous clue:
astro_jou761→ X postSpace Odditykeyword → GitHub repo- Commit history → deleted
ahtopot.jpg exiftool→ EXIFAuthor→ flag
Final flag: RKN{saV9raXppX2}
03 — kepler10b.apk
The app shows several flag-like strings at first glance, but they’re all decoys.
Goal
Extract the real flag from kepler10b.apk.
Quick Summary
The flow inside the app:
- The manifest, Java code, and native libraries are inspected.
- Several decoy flags are identified.
- The login check inside
LoginActivityis analyzed. - The correct password is extracted from the native
verifyfunction. - The real flag is generated dynamically inside
FlagActivity.
Decoy Flags
Strings that show up during static analysis but aren’t real:
FLAG{check_the_manifest_next_time}inAndroidManifest.xmlFLAG{g00d_try_keep_d1gg1ng}inside the native.soFLAG{static_analysis_not_enough}inLoginActivity
These decoys all share one trait: they’re reachable without completing the full app flow. The challenge planted them specifically to mislead surface-level static analysis.
Step by Step
1. Open the APK and inspect the login flow
Opening the APK with jadx, LoginActivity reveals:
- the username must be
admin - password validation is delegated to
NativeLib.verify(password)
So the Java side is just orchestrating; the real password check lives in native code.
2. Extract the correct password from the native verify function
Analyzing the native library, the expected password is:
_wr0ngp4ssw0rd_With this value, login succeeds and the second part of the app activates.
3. Reverse the real generation chain in FlagActivity
The actual flag isn’t stored as plaintext anywhere. Inside FlagActivity, the flow is:
- Read
res/raw/seed - Call native
getKeyMaterial() - XOR these two
- XOR the intermediate output with
assets/vault.enc - Display the result
In compact form:
mix = keyMaterial XOR seed
flag = vault.enc XOR mix
4. Unwind the XOR layers
The two intermediate buffers used by the challenge:
seed        = aa bb cc dd 11 22 33 44 55 66 77 88 99 aa bb cc
keyMaterial = e4 de b9 af 70 4e 78 21 2c 57 44 bb ae 8b 84 ed
XOR’ing those gives mix. Applying XOR with vault.enc then yields the real flag.
Conclusion
The lesson here: don’t trust the first strings static analysis surfaces. The real output is only reachable once the right native password is found and the XOR chain in FlagActivity is reversed.
Final flag: FLAG{R4C0NF_2026_M0B1L3_C0MPL3T3D}
04 — Orbital Communications
The solution involves file-system analysis, file-carving deleted artifacts, opening a password-protected archive, and decoding an audio signal with Morse-style encoding.
Goal
Recover the critical message hidden inside the the_last_orbit.dd image.
Quick Summary
The chain:
- Confirm the image’s GPT and NTFS layout.
- Extract the file tree and identify important artifacts.
- Pull password hints from logs and browser data.
- Find a deleted Chrome login record on the raw disk.
- Open the
orbital_backuparchive with the recovered password. - Decode
signal.wavfrom the archive. - Recover the
RACONF.COM/4815162342message from the audio.
Step by Step
1. Validate the image structure
First, file type and partition layout:
file the_last_orbit.dd
ls -lh the_last_orbit.dd
shasum -a 256 the_last_orbit.dd
gpt -r show the_last_orbit.dd
Key observations:
- raw disk image
- size around
50 MiB - GPT partition table
- a single basic data partition
- partition starts at sector
128(byte offset65536)
2. Identify the file system
Boot sector at the partition start:
dd if=the_last_orbit.dd bs=512 skip=128 count=8 2>/dev/null | xxdThe NTFS signature appears — main partition is NTFS 3.1.
3. List the file tree
Without classic forensic tools, contents listed via 7z:
7z l the_last_orbit.ddNotable files:
Downloads/orbital_backupDownloads/signal.mp3Logs/slack_export_1310.logUsers/orbital/Local/Google/Chrome/User Data/Default/logins.json
4. Gather context from text artifacts
Small files dumped to stdout:
7z x -so /tmp/the_last_orbit_extract/basic_data_partition.img "Logs/slack_export_1310.log"
7z x -so /tmp/the_last_orbit_extract/basic_data_partition.img "Users/orbital/Local/Google/Chrome/User Data/Default/logins.json"
Notable findings:
- Slack logs hint that Kate reuses a password in multiple places.
logins.jsoncontains a password-like value.- However, the value in the live files doesn’t open the
orbital_backuparchive.
So the solution comes from deleted artifacts — not just the live files.
5. Search for deleted login data on the raw disk
String and signature search across the entire image:
strings -n 4 the_last_orbit.dd | rg -i "orbital-intranet|encryptedPassword|Login Data|SQLite format|password TEXT|raccoon_master"
rg -a -b "orbital-intranet.local|encryptedPassword|origin_url TEXT" the_last_orbit.dd
Two relevant findings:
- Remnants of a database with the
SQLite format 3header. - Traces of a deleted Chrome
Login Dataartifact.
6. Carve the deleted SQLite database
A small chunk was carved at the located offset and opened as SQLite:
dd if=the_last_orbit.dd of=/tmp/the_last_orbit_extract/recovered_logins.sqlite bs=1 skip=9232384 count=102400
file /tmp/the_last_orbit_extract/recovered_logins.sqlite
sqlite3 /tmp/the_last_orbit_extract/recovered_logins.sqlite '.tables'
sqlite3 /tmp/the_last_orbit_extract/recovered_logins.sqlite 'select * from logins;'
The actual record in the logins table:
http://orbital-reactor-login.local|admin_orbital|Q-K3y_0rb1t@l_77x$!That’s the real password — invisible in the live files but recoverable from deleted data.
7. Validate the archive password
First, extract the archive as a separate ZIP:
7z x -so /tmp/the_last_orbit_extract/basic_data_partition.img "Downloads/orbital_backup" > /tmp/the_last_orbit_extract/orbital_backup.zipThen test the recovered passwords:
sqlite3 /tmp/the_last_orbit_extract/recovered_logins.sqlite 'select password from logins' | while read p; do
  printf '%s -> ' "$p"
  7z t -p"$p" /tmp/the_last_orbit_extract/orbital_backup.zip >/dev/null 2>&1 && echo OK && break || echo NO
done
Correct password: Q-K3y_0rb1t@l_77x$!
8. Extract signal.wav from the archive
7z x -y -p'Q-K3y_0rb1t@l_77x$!' /tmp/the_last_orbit_extract/orbital_backup.zip -o/tmp/the_last_orbit_extract/orbital_backup_files
afinfo /tmp/the_last_orbit_extract/orbital_backup_files/signal.wav
File properties:
WAVE,8-bit unsigned PCM,mono,8000 Hz- ~
18.56 seconds
Not speech — a structured signal of regular tones.
9. Decode the audio signal
After raw analysis and a short FFT pass:
- dominant frequency around
550 Hz - information is carried in amplitude, not frequency
- on/off durations are in
1 unitand3 unitratios → Morse-style encoding
Raw symbol dump:
.-. .- -.-. --- -. ..-. .-.-.- -.-. --- -- -..-. ....- ---.. .---- ..... .---- -.... ..--- ...-- ....- ..---Here .-.-.- decodes to . and -..-. decodes to /.
Conclusion
The key insight: don’t stop at live files — the real artifacts are in deleted regions of the raw disk.
Q-K3y_0rb1t@l_77x$!   -> archive password
RACONF.COM/4815162342  -> message recovered from the audio
05 — Helix Biocore
The solution involves factoring a weak RSA key, decrypting the RSA-wrapped AES key, and finally peeling off the AES-CBC layer to reveal the plaintext.
Goal
Recover the real flag inside biocore_packet.json.
Quick Summary
The packet uses a hybrid scheme:
- AES key wrapped with RSA
- the actual data encrypted with AES
- the provided RSA public key is only
512-bit— practically breakable
The right approach:
- Extract
nandefrom the public key - Factor
nand reconstruct the private key - Decrypt the RSA-wrapped AES key
- Decrypt the final data with the AES key
Packet Structure
The provided JSON has three fields:
{
  "encrypted_aes_key": "X06IwOX5ivBOEm5/0I3uz3mxn++9Me68hNiK+7/5/Srodh1vfE/HSvxyu96KEVl3eZ8Z7+lFkx4g7G6BINeM3Q==",
  "iv": "5l2jLBzRe2SSCFfx8aAJcg==",
  "genome_sequence": "gB0kPlM1VOQpv9nbuktyLg=="
}
Step by Step
1. Factor the RSA modulus
The modulus from the public key is 512-bit. Factors:
p = 80988589455501896011739178268999336156860010652732643480830847714524041407079
q = 110897562622294808004783687269172110140112354020217622832576188018309973983661
Then phi = (p-1)*(q-1) and d = e^-1 mod phi recover the private exponent.
2. Decrypt the wrapped AES key
The encrypted_aes_key is wrapped with PKCS#1 v1.5 padding. After RSA decryption, base64-decoding the result gives the actual AES key:
61f4eeaa16174ec3738e32c4e9a164783. Decrypt the final data with AES-CBC
- AES key =
61f4eeaa16174ec3738e32c4e9a16478 - IV =
e65da32c1cd17b64920857f1f1a00972 - Ciphertext =
801d243e533554e429bfd9dbba4b722e
AES-CBC decrypt + PKCS#7 unpadding → real flag.
Python Solution
import json, base64
from Crypto.PublicKey import RSA
from Crypto.Cipher import PKCS1_v1_5, AES
from Crypto.Util.number import inverse
from Crypto.Util.Padding import unpad

p = 80988589455501896011739178268999336156860010652732643480830847714524041407079
q = 110897562622294808004783687269172110140112354020217622832576188018309973983661
e = 65537
n = p * q
d = inverse(e, (p-1)*(q-1))
priv = RSA.construct((n, e, d, p, q))

with open("biocore_packet.json") as f:
    packet = json.load(f)

wrapped = base64.b64decode(packet["encrypted_aes_key"])
iv      = base64.b64decode(packet["iv"])
ct      = base64.b64decode(packet["genome_sequence"])

msg     = PKCS1_v1_5.new(priv).decrypt(wrapped, b"BAD")
aes_key = base64.b64decode(msg)
flag    = unpad(AES.new(aes_key, AES.MODE_CBC, iv).decrypt(ct), 16)
print(flag.decode())
Conclusion
The weak link was the 512-bit RSA key. Once the private key is reconstructed, the rest is a standard hybrid-crypto unwrap.
Final flag: RKN{1vcl9zYWN}
06 — Quante Systems
The solution rests on reading three binaries together: one provides the XOR core, another the character-permutation logic, and the last contains the actual verification flow.
Goal
Recover the correct input key, then the real flag.
Quick Summary
The three files have distinct roles:
quantex_audit.bin: misleading, but reveals the XOR corequantex_backup.bin: shows the permutation applied to charactersquantex_guard.bin: the final verification module — actual comparison happens here
The right approach is to read the three pieces together and reverse the transformation.
Step by Step
1. Gather initial clues
dead_drop_01.txt and incident_report.log make it clear that the verification chain isn’t isolated to a single binary. So inspecting only one of them yields incomplete results.
2. Extract the XOR core
Inspecting the input-handling flow inside quantex_guard.bin, the user’s input is first masked with a 3-byte repeating XOR:
13 37 42So input bytes are masked with this loop:
input[i] ^ key[i % 3]3. Locate the permutation step
quantex_backup.bin shows that verification isn’t just XOR. The XOR’d data goes through a permutation with this index order:
[2, 0, 4, 1, 3, 6, 5, 8, 7, 9, 10, 11, 12]Meaning the final comparison is performed not on the user’s input directly, but on data after XOR and permutation.
4. Reverse the final check in the guard module
Inside quantex_guard.bin:
- XOR is applied to the input
- The output is reordered
- The resulting 13 bytes are compared to a target sequence in the binary
- A checksum is also validated
Reversing these steps, the expected correct input key is: s4Us1B3R4Ev3r
Generating the Flag
With the correct input found, quantex_guard.bin’s .data section reveals these 16 bytes:
78 61 64 51 60 1b 48 6c 13 42 48 47 6c 45 4e 57XOR’ing them with 0x2a produces the real output.
Conclusion
The trick in this challenge was reading the modules as a chain rather than in isolation.
Correct input key: s4Us1B3R4Ev3r
Final flag: RKN{J1bF9hbmFod}